Overview of PyTorch Multi-GPU [DataParallel, DistributedDataParallel, torchrun]
- 4/18/2022
- Update: 7/27/2022
- PyTorch
The machine learning library PyTorch provides several methods for training on multiple machines and GPUs.
At the time of writing, PyTorch’s stable version is 1.11.0, but execution methods were changed/added in recent versions 1.9.0 and 1.10.0, so I’ll summarize them.
DataParallel vs DistributedDataParallel
There are two implementation methods for training with multiple GPUs in PyTorch:
torch.nn.DataParalleltorch.nn.DistributedDataParallel
The difference between these two is whether CPU cores assigned to multiple GPUs are one for all or multiple for each GPU.
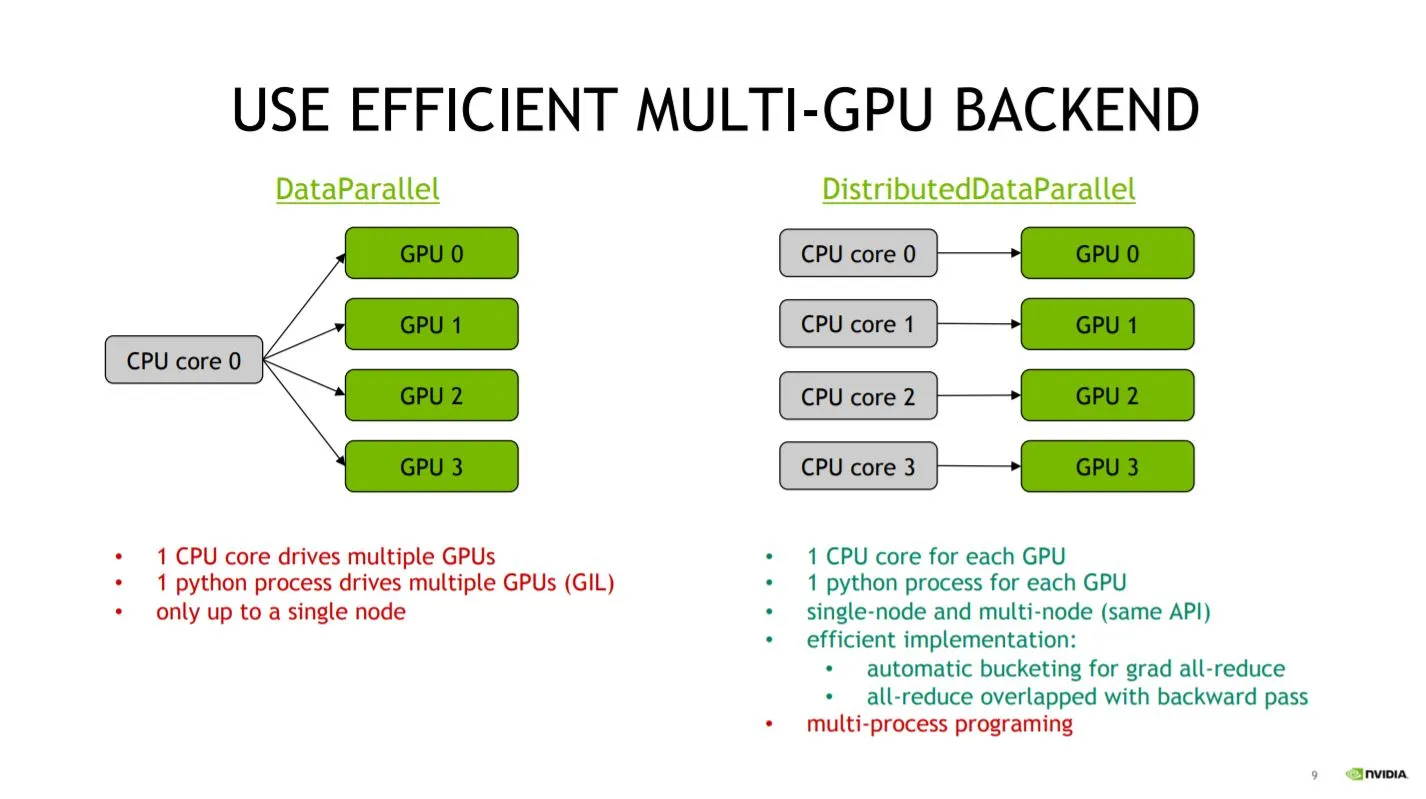
As shown in the figure above1, due to Python’s GIL constraints, using DistributedDataParallel allows assigning individual CPU cores to each GPU, enabling full utilization of resources.
The ability to run on multiple machines (Multi-node) is also a strength.
In fact, the official documentation2 recommends DistributedDataParallel.
At this point, the merits of DataParallel might not be apparent, but looking at implementation differences reveals the advantages.
First, the DataParallel implementation is as follows:
import torch

model = hoge()
+ model = torch.nn.DataParallel(model, device_ids=[0,1,2,3])
As shown above, you can implement it by simply wrapping an existing model (torch.nn.Model) with torch.nn.DataParallel, changing just one line of existing code.
Next, let’s check an implementation example of DistributedDataParallel:
import os
import torch
import torch.distributed as dist
from torch.nn.parallel import DistributedDataParallel as DDP
from torch.utils.data.distributed import DistributedSampler

# Local Rank indicates which GPU process number
# When GPU ID = 1, local_rank=1
local_rank = os.getenv('LOCAL_RANK', 0)

# Define communication method and initialize process group
dist.init_process_group(backend='nccl', init_method='env://')

dataset = Dataset(hoge)

# Use DistributedSampler
sampler = DistributedSampler(dataset, rank=local_rank)
dataloaders = torch.utils.data.DataLoader(dataset,
                                          batch_size=16,
                                          sampler=Distributed)

# Wrap with DistributedDataParallel
model = Model(fuga)
model = DDP(model)

# ...

# Training completion
dist.destroy_process_group()
DistributedDataParallel is designed to use the same syntax for both single and multi-machine cases, so there are many new parts to implement.
With multiprocessing, you need to be aware of which process you’re currently in while implementing.
As shown above, DataParallel can change existing code with one line, but DistributedDataParallel requires some additional implementation.
For easily trying multi-GPU training, use DataParallel.
Since the next chapter discusses the newly added torchrun, from here on we’ll consider the case using DistributedDataParallel.
Execution Methods for DistributedDataParallel
There are broadly two execution methods for DistributedDataParallel:
- GPU parallelization for specific functions (
mp.spawn) - GPU parallelization for entire scripts (
torchrun,torch.distributed.run,torch.distributed.launch)
1. Function-level Parallelization
Method 1, parallelizing per function, allows you to write training functions in code and set the number of GPUs and communication methods within the code for execution.
This means both single GPU and multi-GPU code can be executed with the same command python train.py.
Implementation examples are written in PyTorch’s official ImageNet training implementation.
The part that differs significantly from method 2 is:
import torch.multiprocessing as mp

def train(rank, hoge):
    dist.init_process_group(backend='nccl', init_method='env://')

def main():
    mp.spawn(train, nprocs=ngpus_per_node, args=(hoge))
As shown above, the code is no different from Python’s standard multiprocessing module.
However, since the standard module performs multiple CUDA initializations causing errors, we use torch.multiprocessing, which wraps the multiprocessing module.
2. Script-level Parallelization
Method 2 has different execution methods depending on PyTorch version.
Before version 1.9.0, it was executed with:
python -m torch.distributed.launch --nproc_per_node=4 --nnodes=1 --node_rank 0 train.py
From version 1.9.0 onwards, due to TorchElastic addition, it can also be executed with:
python -m torch.distributed.run --nproc_per_node=4 --nnodes=1 --node_rank 0 train.py
Also, torchrun has been provided from Version 1.10.0 as a superset of torch.distributed.launch.
Here I’ll describe the conventional methods: torch.distributed.launch and torch.distributed.run.
For torch.distributed.launch and torch.distributed.run,
the execution script train.py needs to be implemented to receive --local_rank as a command-line argument. Here’s an example:
import argparse
parser = argparse.ArgumentParser()
parser.add_argument("--local_rank", type=int)
args = parser.parse_args()

local_rank = args.local_rank
Other implementation is the same as method 1’s function-level multiprocessing.
Differences Between Execution Methods 1 and 2
The difference between method 1 (function multiprocessing) and script multiprocessing can be described as multiprocessing(1) vs subprocess(2), as mentioned in [this official forum]3.
Github Issues4 5 report that method 1 is slower due to GPU transfer speed relationships. This seems negligible for long training periods, but worth noting as reference.
New Execution Method torchrun
From PyTorch Version 1.10.0, torchrun has appeared as a superset of torch.distributed.launch.
The official documentation6 has clear migration steps, so I recommend reading it.
Specifically, the execution command changes as follows:
# use_env is an option to receive LOCAL RANK from
# environment variables instead of argparse
python -m torch.distributed.launch --use_env train_script.py

torchrun train_script.py
Local rank, previously received via argparse, is now received from environment variables:
# torch.distributed.launch
import argparse
parser = argparse.ArgumentParser()
parser.add_argument("--local_rank", type=int)
args = parser.parse_args()

local_rank = args.local_rank

# torchrun
import os
local_rank = int(os.environ["LOCAL_RANK"])
While the user experience is largely unchanged, not having to create argument receivers with argparse has the advantage of not polluting the command-line argument namespace. For example, when using Facebook’s configuration management library [Hydra]7, which can’t be used alongside argparse, there’s a benefit to torchrun using environment variables. (However, as discussed [here]8 9, there are output-related conflict issues, so future developments should be watched.)
As written [here]10, torch.distributed.launch appears to be deprecated in the future, so implementation should move to torchrun going forward.
References
Footnotes
-
https://qiita.com/sugulu_Ogawa_ISID/items/62f5f7adee083d96a587#4-multi-gpu%E3%81%AE%E8%A8%AD%E5%AE%9A ↩
-
https://pytorch.org/docs/1.11/notes/cuda.html#use-nn-parallel-distributeddataparallel-instead-of-multiprocessing-or-nn-dataparallel ↩
-
https://discuss.pytorch.org/t/torch-distributed-launch-vs-torch-multiprocessing-spawn/95738 ↩
-
https://pytorch.org/docs/1.11/distributed.html#launch-utility ↩