Building MLflow Tracking On-Premises
- 9/5/2022
- Update: 9/5/2022
- Tool
Hello. This time I’ll introduce how to build MLflow, an experiment management tool, on-premises.
Motivation for Introduction
When working with machine learning, you end up conducting various experiments while changing hyperparameters, models, and datasets. I decided to introduce an experiment management tool that allows efficient comparison of results to smoothly compare experiments.
While there are various experiment management tools like TensorBoard and Weight & Bias (wandb) in the currently thriving MLOps scene, MLflow has recently gained significant popularity as an option.
However, among the various experiment management tools, focusing on “on-premises” and “self-hosted servers” that can handle data without external transmission, there aren’t many options. I decided to try building MLflow, which is probably the most widely used.
What is MLflow
MLflow is an open-source machine learning lifecycle management tool, divided into modules consisting of MLflow Tracking, Projects, Models, and Registry.
This time I’ll mainly summarize how to build MLflow Tracking Server on an on-premises server. With MLflow Tracking, you can centrally manage machine learning model hyperparameters, accuracy, and log files on the MLflow side, making it easy to compare experiments.
Architecture Diagram
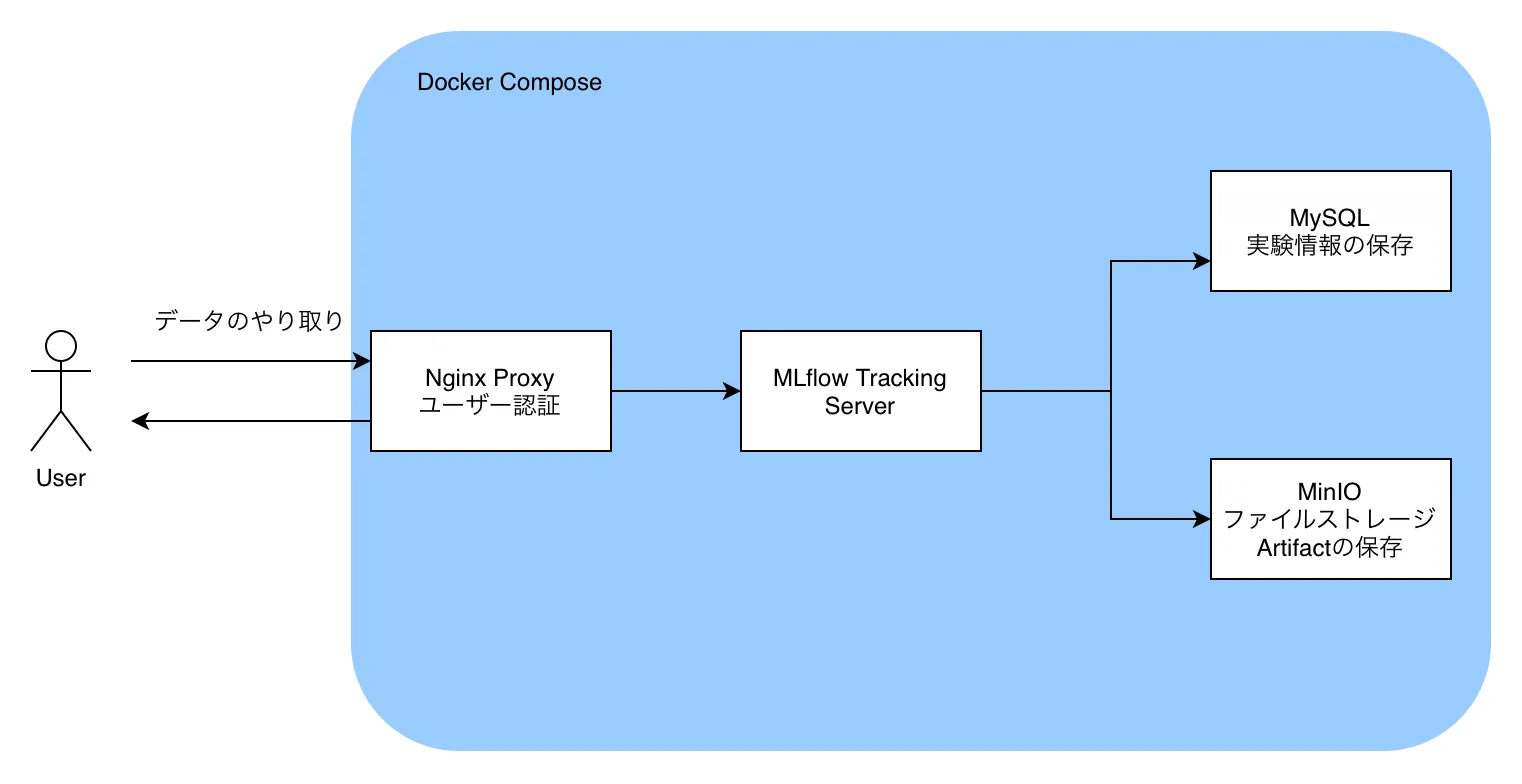
This time we’ll build MLflow Tracking Server using Docker Compose.
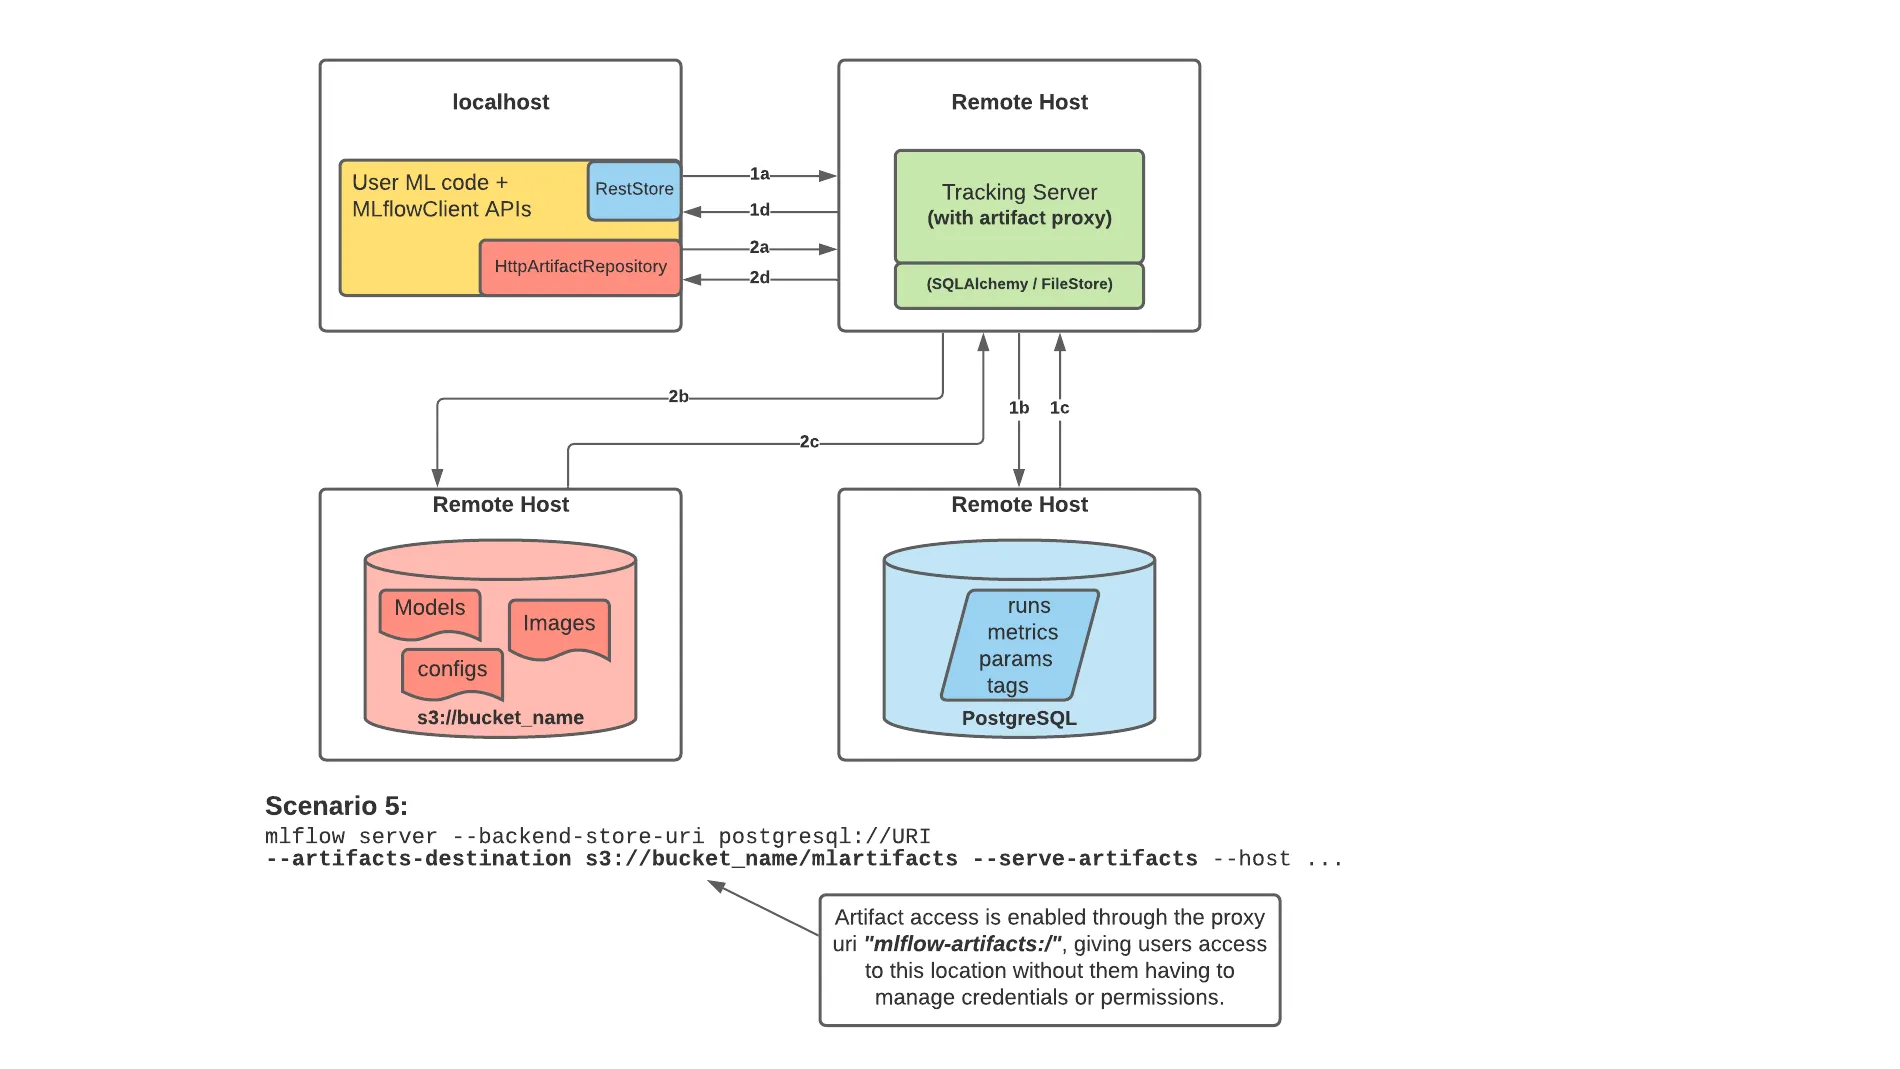
MLflow can store not only numerical values like experiment results, but also binary files like config files, source code, and trained model files. In this case, binary files are called artifacts and are stored separately from numerical values.
This time, as shown in MLflow documentation, we’ll save experiment parameters etc. to a MySQL DB and store artifacts in MinIO, an AWS S3-compatible object file storage built with Docker.
Also, to add user authentication to MLflow, we’ll use Docker’s nginx-proxy to introduce Basic authentication.
Docker Compose
So we’ll build by setting up the following containers with Docker Compose:
- Nginx Proxy (jwilder/nginx-proxy)
- MLflow Tracking Server
- MySQL 8.0
- MinIO
A working example is available on this GitHub:
First, the Dockerfile for MLflow Tracking Server is as follows:
FROM python:3.10
RUN pip install -U pip && \
    pip install --no-cache-dir mlflow mysqlclient boto3
The overall docker-compose.yml is as follows. In the example below, mlflow listens on port 5000:
version: "3.8"
services:
  # MLflow
  mlflow:
    container_name: mlflow
    build:
      context: .
      dockerfile: Dockerfile
    expose:
      - 80
    restart: unless-stopped
    depends_on:
      - db
      - minio
    environment:
      TZ: Asia/Tokyo
      VIRTUAL_HOST: "example.com,localhost"
      MLFLOW_S3_ENDPOINT_URL: http://minio:9000
      AWS_ACCESS_KEY_ID: minio
      AWS_SECRET_ACCESS_KEY: minio
    command: >
      mlflow server
      --backend-store-uri 'mysql+mysqldb://mlflow:mlflow@db:3306/mlflow'
      --artifacts-destination 's3://mlflow/artifacts'
      --serve-artifacts --host 0.0.0.0 --port 80
    networks:
      - mlflow-net

  db:
    image: mysql:8.0.29
    restart: unless-stopped
    environment:
      MYSQL_USER: mlflow
      MYSQL_PASSWORD: mlflow
      MYSQL_ROOT_PASSWORD: mlflow
      MYSQL_DATABASE: mlflow
      TZ: Asia/Tokyo
    cap_add:
      # https://github.com/docker-library/mysql/issues/422
      - SYS_NICE
    volumes:
      - ./mysql/data:/var/lib/mysql
      - ./mysql/my.cnf:/etc/mysql/conf.d/my.cnf
    networks:
      - mlflow-net

  # S3-compatible storage
  minio:
    image: minio/minio
    restart: unless-stopped
    volumes:
      - ./minio:/export
    environment:
      MINIO_ACCESS_KEY: minio
      MINIO_SECRET_KEY: minio
    command: server /export
    networks:
      - mlflow-net

  # Automatically create default bucket when minio container starts
  defaultbucket:
    image: minio/mc
    depends_on:
      - minio
    entrypoint: >
      /bin/sh -c "
      until (/usr/bin/mc config host add minio http://minio:9000 minio minio) do echo 'try to create buckets...' && sleep 1; done;
      /usr/bin/mc mb minio/mlflow;
      /usr/bin/mc policy download minio/mlflow;
      exit 0;
      "
    networks:
      - mlflow-net

  nginx-proxy:
    image: jwilder/nginx-proxy
    restart: unless-stopped
    ports:
      - "5000:80"
    volumes:
      - ./nginx/htpasswd:/etc/nginx/htpasswd
      - ./nginx/certs/:/etc/nginx/certs
      - ./nginx/conf.d/proxy.conf:/etc/nginx/conf.d/proxy.conf
      - /var/run/docker.sock:/tmp/docker.sock:ro
    networks:
      - mlflow-net
networks:
  mlflow-net:
    driver: bridge
Let’s look at the docker-compose.yml in order:
MLflow
Below, we’re setting up MLflow Tracking Server.
This time, since we’re using MinIO in the same container network as artifact storage, we set AWS_ACCESS_KEY_ID and AWS_SECRET_ACCESS_KEY.
Also, considering accessing MLflow UI via ssh port forward etc., we add not only the server hostname but also localhost to VIRTUAL_HOST. Due to nginx-proxy requirements, we listen on port 80.
The mlflow command option --backend-store-url passes the uri in the same way as SQL Alchemy.
  mlflow:
    container_name: mlflow
    build:
      context: .
      dockerfile: Dockerfile
    expose:
      - 80
    restart: unless-stopped
    depends_on:
      - db
      - minio
    environment:
      TZ: Asia/Tokyo
      VIRTUAL_HOST: "example.com,localhost"
      MLFLOW_S3_ENDPOINT_URL: http://minio:9000
      AWS_ACCESS_KEY_ID: minio
      AWS_SECRET_ACCESS_KEY: minio
    command: >
      mlflow server
      --backend-store-uri 'mysql+mysqldb://mlflow:mlflow@db:3306/mlflow'
      --artifacts-destination 's3://mlflow/artifacts'
      --serve-artifacts --host 0.0.0.0 --port 80
    networks:
      - mlflow-net

  db:
    image: mysql:8.0.29
    restart: unless-stopped
    environment:
      MYSQL_USER: mlflow
      MYSQL_PASSWORD: mlflow
      MYSQL_ROOT_PASSWORD: mlflow
      MYSQL_DATABASE: mlflow
      TZ: Asia/Tokyo
    cap_add:
      # https://github.com/docker-library/mysql/issues/422
      - SYS_NICE
    volumes:
      - ./mysql/data:/var/lib/mysql
      - ./mysql/my.cnf:/etc/mysql/conf.d/my.cnf
    networks:
      - mlflow-net
Then, place MySQL configuration in the container at /etc/mysql/conf.d/my.cnf. Timeout and character encoding settings are added:
[mysql]
default-character-set=utf8mb4

[mysqld]
character-set-server=utf8mb4
collation-server=utf8mb4_unicode_ci
wait_timeout = 31536000
interactive_timeout = 31536000
MinIO
MinIO, an AWS S3-compatible object file storage, can be built as follows:
Set the MINIO_ACCESS_KEY and MINIO_SECRET_KEY configured here to match MLflow’s AWS keys.
defaultbucket is a command that creates MLflow’s storage bucket when the container starts.
Note that there are places to input MINIO_ACCESS_KEY and MINIO_SECRET_KEY in the entrypoint as well.
  # S3-compatible storage
  minio:
    image: minio/minio
    restart: unless-stopped
    volumes:
      - ./minio:/export
    environment:
      MINIO_ACCESS_KEY: minio
      MINIO_SECRET_KEY: minio
    command: server /export
    networks:
      - mlflow-net

  # Automatically create default bucket when minio container starts
  defaultbucket:
    image: minio/mc
    depends_on:
      - minio
    entrypoint: >
      /bin/sh -c "
      until (/usr/bin/mc config host add minio http://minio:9000 minio minio) do echo 'try to create buckets...' && sleep 1; done;
      /usr/bin/mc mb minio/mlflow;
      /usr/bin/mc policy download minio/mlflow;
      exit 0;
      "
    networks:
      - mlflow-net
nginx-proxy
Here, we set up nginx-proxy to add Basic authentication to MLflow. In the example below, you can connect to MLflow on server port 5000:
  nginx-proxy:
    image: jwilder/nginx-proxy
    restart: unless-stopped
    ports:
      - "5000:80"
    volumes:
      - ./nginx/htpasswd:/etc/nginx/htpasswd
      - ./nginx/certs/:/etc/nginx/certs
      - ./nginx/conf.d/proxy.conf:/etc/nginx/conf.d/proxy.conf
      - /var/run/docker.sock:/tmp/docker.sock:ro
    networks:
      - mlflow-net
This time, to add Basic authentication with Nginx Proxy, we also prepare Basic authentication user and password:
# Host PC side
cd nginx/htpasswd
htpasswd -c [domain name] [username]
With jwilder/nginx-proxy, you can add Basic authentication by placing files with domain names in /etc/nginx/htpasswd in the container.
Also, by default nginx-proxy has capacity limits for file transfers, so we increase this with configuration.
You can configure by placing settings in /etc/nginx/conf.d/proxy.conf in the container:
# /etc/nginx/conf.d/proxy.conf
client_max_body_size 5g;
This completes server construction. Next, let’s look at calling from the Python script side that conducts experiments.
Experiment Scripts
From MLflow ver. 1.24.0, by using MLflow as a proxy for S3 access, clients no longer need to hold S3 storage credentials for artifact storage destinations. This is convenient both functionally and security-wise. Therefore, the information clients should hold is only:
- MLflow Server URL
- Basic authentication username, password
Set the URL in the script, and by setting Basic authentication information in environment variables, you can access the server from scripts:
import mlflow
import os

MLFLOW_TRACKING_URI="http://example.com:5000"
MLFLOW_TRACKING_USERNAME="mlflow"
MLFLOW_TRACKING_PASSWORD="mlflow"

os.environ("MLFLOW_TRACKING_USERNAME") = MLFLOW_TRACKING_USERNAME
os.environ("MLFLOW_TRACKING_PASSWORD") = MLFLOW_TRACKING_PASSWORD

mlflow.set_tracking_uri(MLFLOW_TRACKING_URI)
After that, just run MLflow as usual.
That’s how to run MLflow completely on-premises.