Building a Machine Learning Server: Installing NVIDIA Driver, CUDA, and Docker on Ubuntu
- 3/2/2024
- Update: 3/2/2024
- Server
Hello. This time I’ll write about the steps to install NVIDIA CUDA and build an environment for running PyTorch, TensorFlow, etc. using NVIDIA GPUs.
While there are many such articles out there, this article differs from others in that it assumes use as a server shared in laboratories or companies.
I’ve been relying on the following “What’s the current status of NVIDIA Docker? (20.09 version)” written by Mr. Sasaki from NVIDIA, but since the situation has changed in recent years, I’ll summarize it here.
This article aims to build an environment with the following:
- Ubuntu 22.04 LTS Server (Desktop is also fine)
- Docker
- NVIDIA Driver, CUDA, NVIDIA Docker
Ubuntu Installation and Configuration
First, install Ubuntu 22.04 LTS Server on the server. At the time of writing, 24.04 LTS will be released in about a month, but 22.04 should be fine until various libraries support it.
Please install Ubuntu using your preferred method. I usually install with the following settings:
- Select server minimize
- Don’t install third-party libraries
- partition: select use as boot, allocate 1GB for boot area, mount the rest to
/(root) - Install OpenSSH-Server
Even when bundling multiple NICs for bonding, it’s easier to modify netplan after installation.
After installing Ubuntu, log into the console and configure settings for remote work.
Package Installation
First, install your favorite libraries:
sudo apt update
sudo apt upgrade

sudo apt install -y \
    avahi-daemon git vim emacs build-essential \
    wget curl jq ffmpeg htop tmux screen parallel \
    imagemagick geeqie iputils-ping net-tools zsh

# Install packages for Python building
sudo apt install -y \
    build-essential libssl-dev zlib1g-dev \
    libbz2-dev libreadline-dev libsqlite3-dev curl \
    libncursesw5-dev xz-utils tk-dev libxml2-dev libxmlsec1-dev \
    libffi-dev liblzma-dev
Brief explanation of the installed packages:
git, wget, curlEssentialavahi-daemonmDNS library; with this installed, you can access from Windows, macOS, Linux viassh server.localetc. from local LAN without setting up DNSemacs, vimInstalling both avoids editor warsbuild-essentialContains various libraries for buildingjqJSON parser. ML dataset information is sometimes provided in JSON formatffmpegProcess videos from command lineimagemagickHandle images from command linetmux, screenMaintain shells after logout, useful for running long training scripts.nohupworks tooparallelServer machines usually have many cores, so use parallel processing for efficiency.xargsworks toohtopView system usage.topworks but htop is more readablegeeqieImage viewer. Light enough to use over X windowiputils-ping, net-toolsUsepingto check other servers and internet connectivityzshInstall your favorite shell
The second apt install is for packages to build Python. Since some server users might use pyenv, let’s install these.
Network Configuration
Next, configure the network.
Ubuntu Server uses netplan for network configuration, so configure yaml files under /etc/netplan.
For Ubuntu Desktop, use NetworkManager.
To fix IP addresses, configure as follows:
Note that from Ubuntu 22.04, gateway4 notation changed to routes.
# This is the network config written by 'subiquity'
network:
  ethernets:
    enp42s0:
      dhcp4: false
      addresses:
        - 192.168.0.2/24
      nameservers:
        addresses: [192.168.0.1]
      # The following is deprecated
      # gateway4: 192.168.0.1
      # Write with routes
      routes:
        - to: default
          via: 192.168.0.1
  version: 2
After configuration, enable settings with sudo netplan apply.
SSH Configuration
Next, configure SSH-Server.
This will vary by environment, so please configure as needed.
For local LAN placement, setting PermitRootLogin and PasswordAuthentication no should suffice.
Once this is done, you can work remotely, so put the server in a rack or wherever. If configuring NFS or LDAP, do it here or after racking.
Docker Installation
Next, install Docker. Recently Docker Desktop is available for Linux too, but Engine should suffice for Linux.
The official site below has “Install using the convenience script” at the bottom, allowing easy installation by downloading the installation script.

curl -fsSL https://get.docker.com -o get-docker.sh
sudo sh get-docker.sh
For shared servers, using rootless Docker is also an option. Note that commands for introducing NVIDIA Docker differ slightly in that case.
Also, add users to the docker group so they can use docker without sudo:
sudo gpasswd -a [username] dockerInstalling NVIDIA Driver, CUDA, Docker
Next, install drivers and CUDA for handling NVIDIA GPUs, essential for machine learning.
Registering apt Repository
From the following site, select your environment and install cuda-keyring:

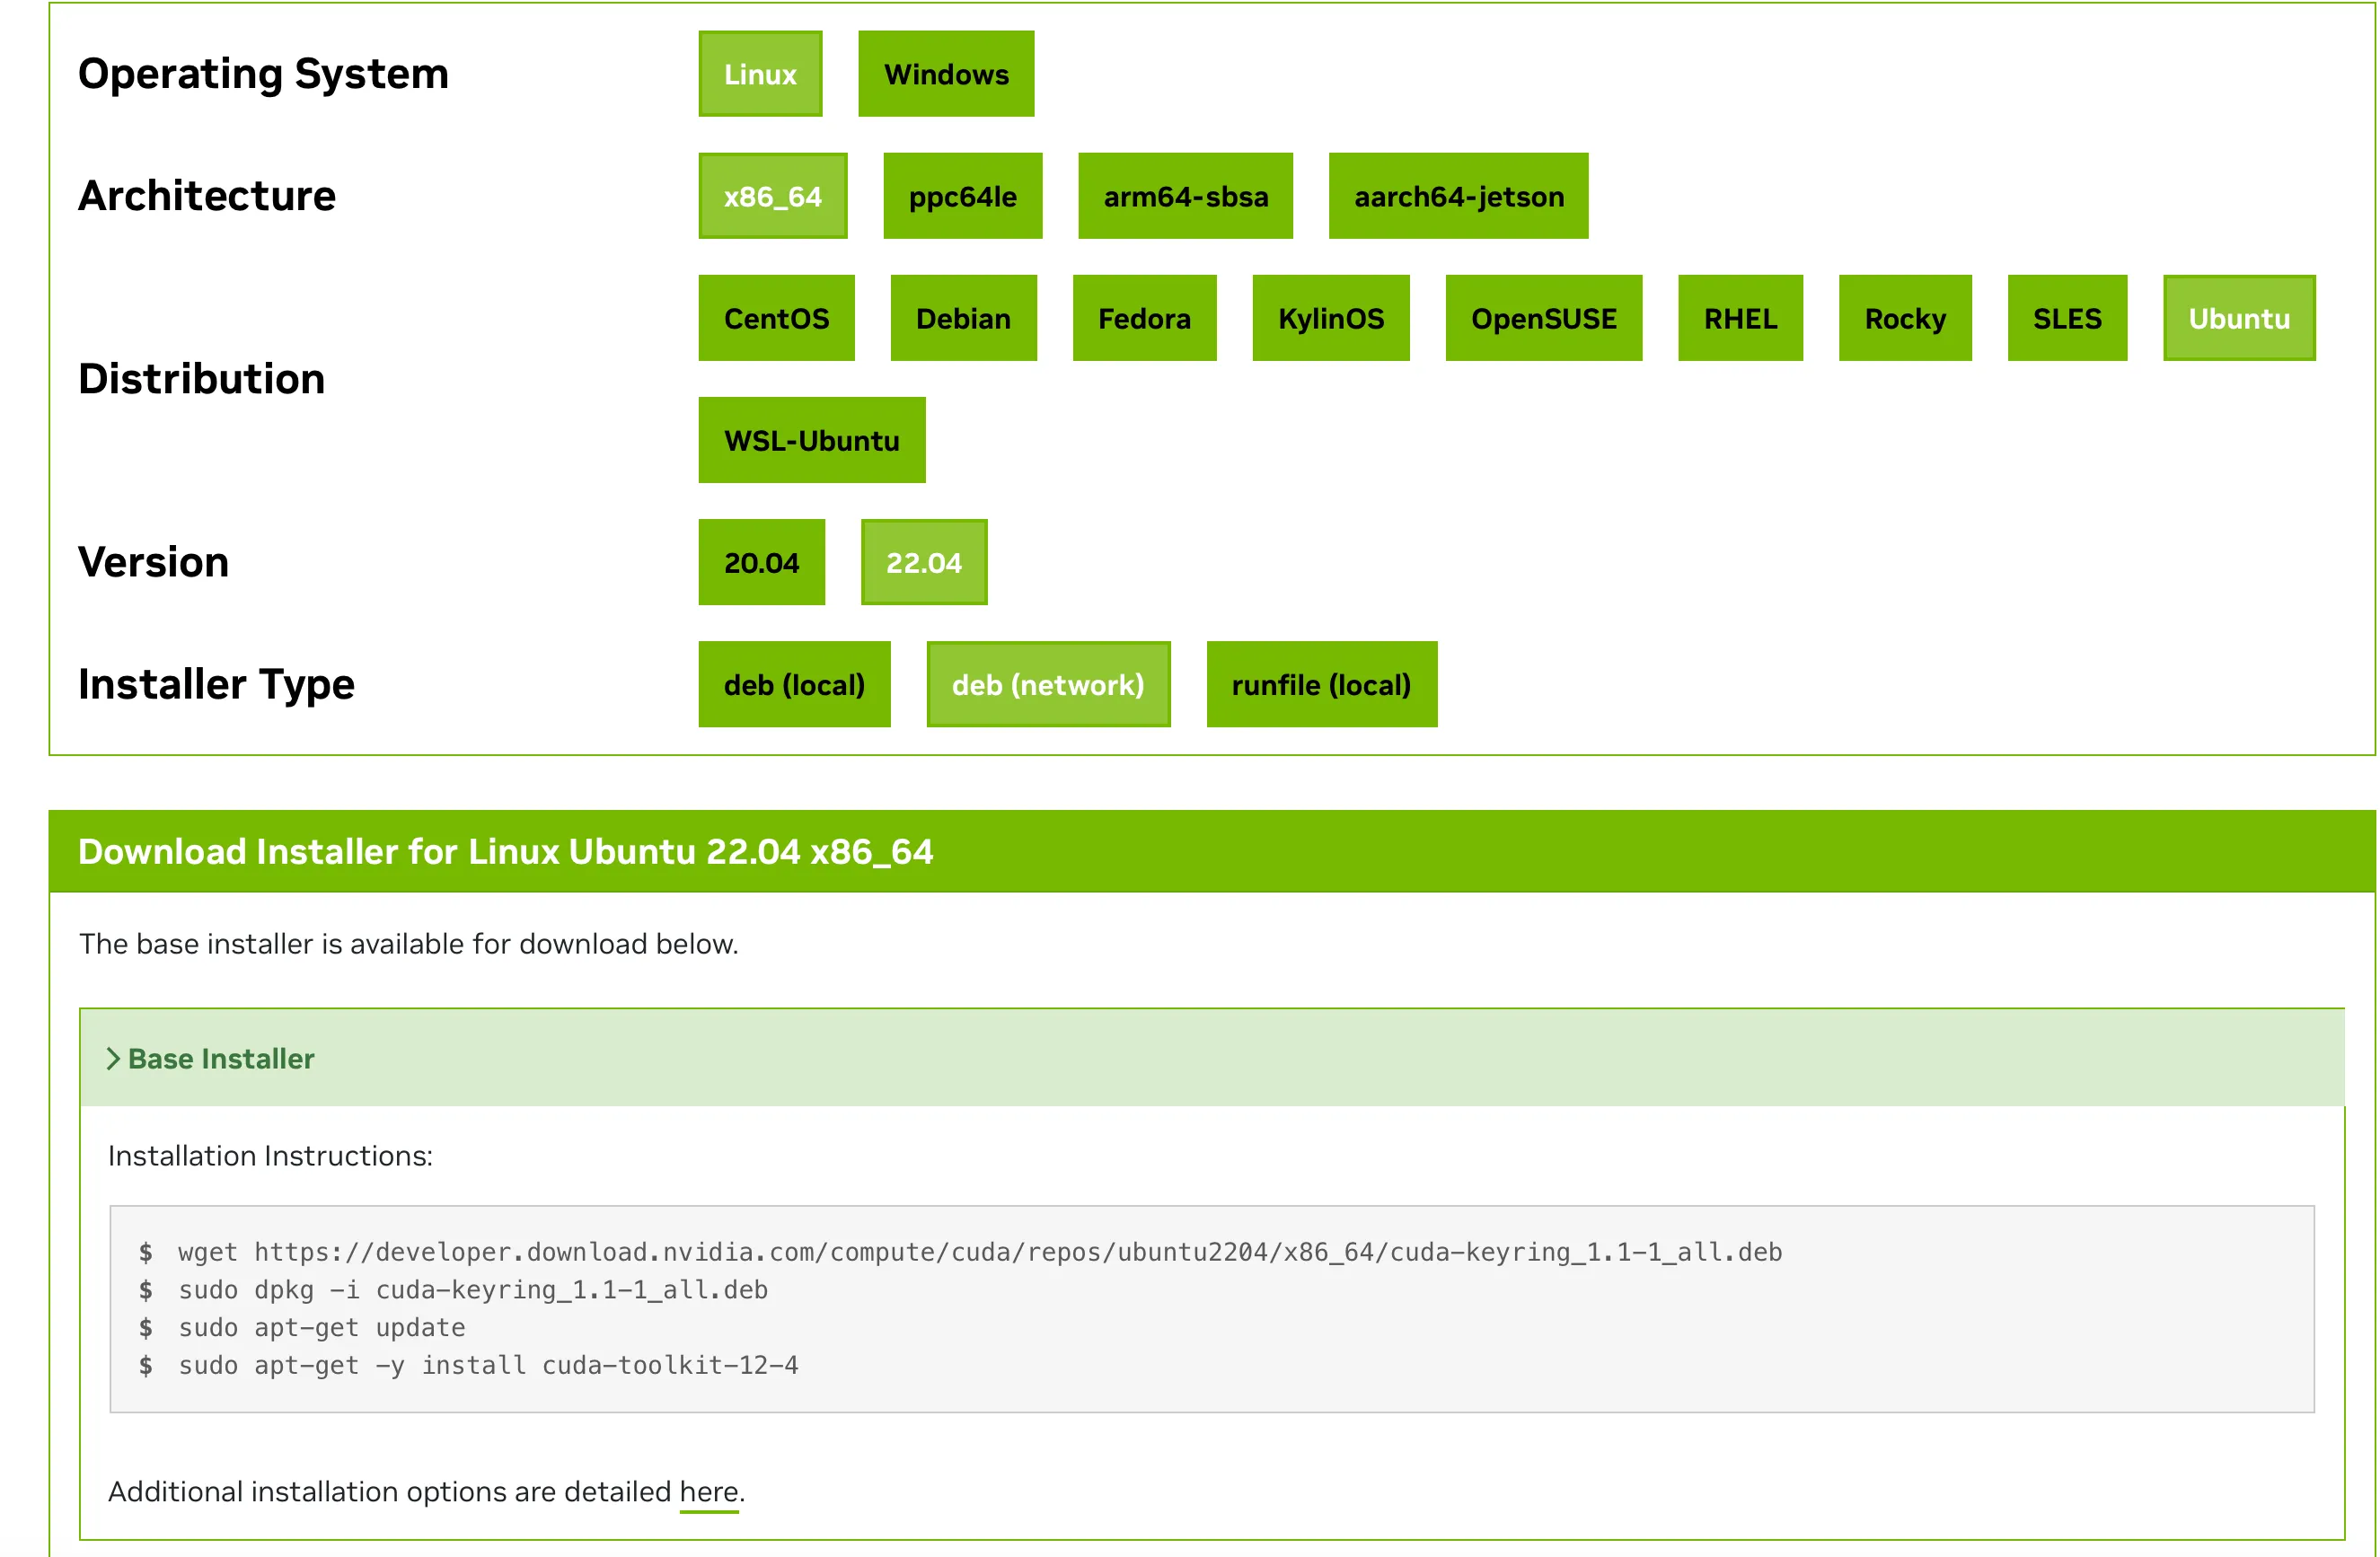
For Ubuntu 22.04, select:
- Linux
- x86_64 (arm64-sbsa for ARM)
- Ubuntu
- 22.04
- dev(network)
Then execute the displayed script up to sudo apt-get update:
wget https://developer.download.nvidia.com/compute/cuda/repos/ubuntu2204/x86_64/cuda-keyring_1.1-1_all.deb
sudo dpkg -u cuda-keyring_1.1-1_all.deb
sudo apt-get update
Installing NVIDIA Driver, CUDA
Next, install CUDA, but first check this table:
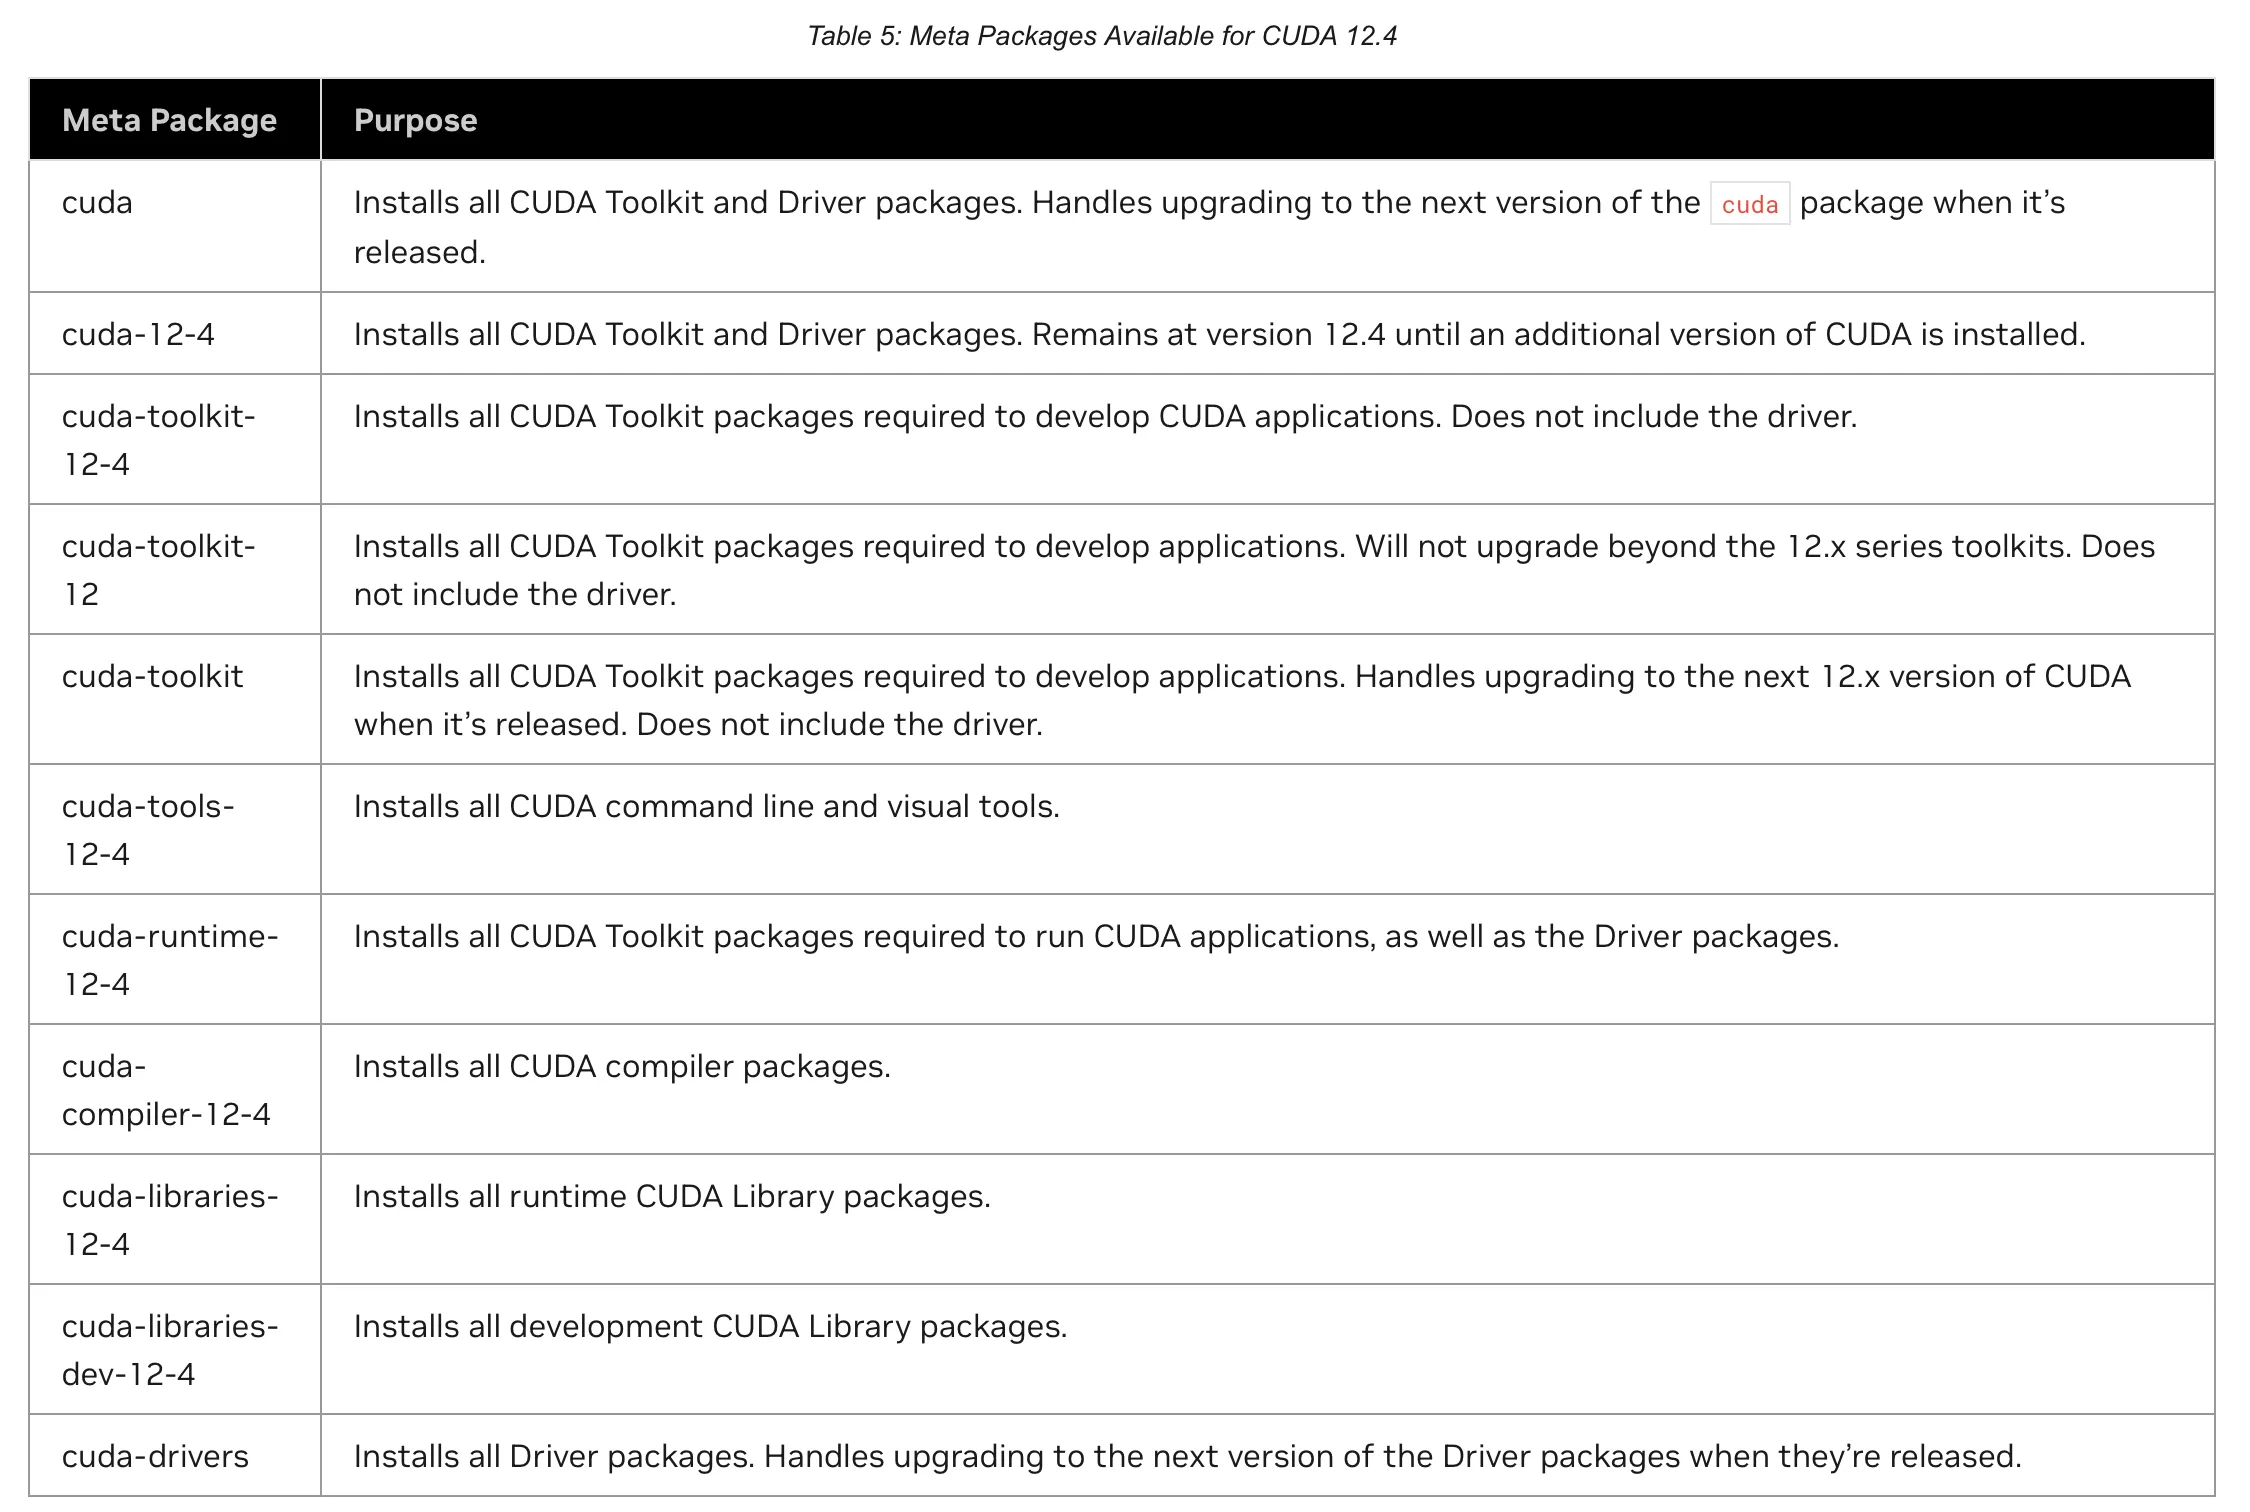
Looking at the above table, sudo apt install cuda would install both driver and CUDA, but when wanting to upgrade only one of driver or CUDA, dependencies would require upgrading both.
Therefore, here we install cuda-toolkit and cuda-driver to separate dependencies:
sudo apt install -y cuda-toolkit
sudo apt install -y cuda-driver
For CUDA versions, since users basically use Docker, the host machine can just have the latest version, so promote Docker usage.
Installing cuDNN
cuDNN stands for NVIDIA CUDA Deep Neural Network library, and when enabled, you can use GPU-optimized implementations for some DNN processing.
As usual, from the following documentation, we see installing cudnn suffices:
(I think it used to be libcudnn8 etc.)
sudo apt install cudnnNVIDIA Docker
NVIDIA Docker is now part of the NVIDIA Container Toolkit system. So to handle NVIDIA GPUs from Docker containers, install nvidia-container-toolkit:
sudo apt-get install -y nvidia-container-toolkitNext, configure Docker. Note that commands differ for rootless Docker (refer to Docker official documentation):
sudo nvidia-ctk runtime configure --runtime=dockerNext, modify Docker config. As mentioned in the following Qiita article and GitHub Issues, there’s a phenomenon where “GPUs that were usable in running Docker containers become unusable after a while.” This seems to be because Docker’s cgroup management uses systemd, causing GPU recognition issues when systemctl daemon-reload is executed.

When Docker is installed by default, docker info shows:
docker info

# (omitted)
 Cgroup Driver: systemd
 Cgroup Version: 2
The file to edit is /etc/docker/daemon.json:
{
    "runtimes": {
        "nvidia": {
            "args": [],
            "path": "nvidia-container-runtime"
        }
    },
    "exec-opts": ["native.cgroupdriver=cgroupfs"]
}
The line to add here is "exec-opts": ["native.cgroupdriver=cgroupfs"].
After writing, restart Docker and confirm the change:
sudo systemctl restart docker
docker info

# (omitted)
 Cgroup Driver: cgroupfs
 Cgroup Version: 2
If it shows cgroupfs, you’re good.
Reboot & Verification
Reboot the server to enable NVIDIA Driver:
sudo reboot nowAfter reboot, add PATH to .bashrc:
export PATH="/usr/local/cuda/bin:$PATH"
export LD_LIBRARY_PATH="/usr/local/cuda/lib64:$LD_LIBRARY_PATH"
export CUDA_HOME="/usr/local/cuda"
source ~/.bashrcThen verify GPU recognition on both host machine and inside containers:
- Host Machine
nvidia-smi

+---------------------------------------------------------------------------------------+
| NVIDIA-SMI 545.23.08              Driver Version: 545.23.08    CUDA Version: 12.3     |
|-----------------------------------------+----------------------+----------------------+
| GPU  Name                 Persistence-M | Bus-Id        Disp.A | Volatile Uncorr. ECC |
| Fan  Temp   Perf          Pwr:Usage/Cap |         Memory-Usage | GPU-Util  Compute M. |
|                                         |                      |               MIG M. |
|=========================================+======================+======================|
|   0  NVIDIA GeForce RTX 4090        On  | 00000000:03:00.0 Off |                  Off |
|  0%   46C    P8              34W / 450W |    112MiB / 24564MiB |      0%      Default |
|                                         |                      |                  N/A |
+-----------------------------------------+----------------------+----------------------+
|   1  NVIDIA GeForce RTX 4090        On  | 00000000:81:00.0 Off |                  Off |
|  0%   50C    P8              28W / 450W |     15MiB / 24564MiB |      0%      Default |
|                                         |                      |                  N/A |
+-----------------------------------------+----------------------+----------------------+

+---------------------------------------------------------------------------------------+
| Processes:                                                                            |
|  GPU   GI   CI        PID   Type   Process name                            GPU Memory |
|        ID   ID                                                             Usage      |
|=======================================================================================|
+---------------------------------------------------------------------------------------+

nvidia-smi -L

GPU 0: NVIDIA GeForce RTX 4090 (UUID: GPU-0b...)
GPU 1: NVIDIA GeForce RTX 4090 (UUID: GPU-0e...)- Container
docker run --rm --gpus all nvidia/cuda:12.3.2-base-ubuntu22.04 nvidia-smi
Unable to find image 'nvidia/cuda:12.3.2-base-ubuntu22.04' locally
12.3.2-base-ubuntu22.04: Pulling from nvidia/cuda
01007420e9b0: Pull complete
bfc08b17629d: Pull complete
86fc789646b5: Pull complete
6b62141c2a21: Pull complete
e0e30e504698: Pull complete
Digest: sha256:8cecfe099315f73127d6d5cc43fce32c7ffff4ea0460eefac48f2b7d811ce857
Status: Downloaded newer image for nvidia/cuda:12.3.2-base-ubuntu22.04
+---------------------------------------------------------------------------------------+
| NVIDIA-SMI 545.23.08              Driver Version: 545.23.08    CUDA Version: 12.3     |
|-----------------------------------------+----------------------+----------------------+
| GPU  Name                 Persistence-M | Bus-Id        Disp.A | Volatile Uncorr. ECC |
| Fan  Temp   Perf          Pwr:Usage/Cap |         Memory-Usage | GPU-Util  Compute M. |
|                                         |                      |               MIG M. |
|=========================================+======================+======================|
|   0  NVIDIA GeForce RTX 4090        On  | 00000000:03:00.0 Off |                  Off |
|  0%   46C    P8              33W / 450W |    112MiB / 24564MiB |      0%      Default |
|                                         |                      |                  N/A |
+-----------------------------------------+----------------------+----------------------+
|   1  NVIDIA GeForce RTX 4090        On  | 00000000:81:00.0 Off |                  Off |
|  0%   50C    P8              28W / 450W |     15MiB / 24564MiB |      0%      Default |
|                                         |                      |                  N/A |
+-----------------------------------------+----------------------+----------------------+

+---------------------------------------------------------------------------------------+
| Processes:                                                                            |
|  GPU   GI   CI        PID   Type   Process name                            GPU Memory |
|        ID   ID                                                             Usage      |
|=======================================================================================|
+---------------------------------------------------------------------------------------+
If recognized as above, you’re good.
Next, verify CUDA version. If displayed as follows, you’re OK:
nvcc -V

nvcc: NVIDIA (R) Cuda compiler driver
Copyright (c) 2005-2023 NVIDIA Corporation
Built on Wed_Nov_22_10:17:15_PST_2023
Cuda compilation tools, release 12.3, V12.3.107
Build cuda_12.3.r12.3/compiler.33567101_0
Stopping Automatic Updates for NVIDIA Driver and CUDA
Ubuntu’s package manager apt has automatic package update mechanisms, but when NVIDIA Driver auto-updates, it causes mismatches between loaded drivers and actual versions, triggering Failed to initialize NVML: Driver/library version mismatch errors when running nvidia-smi, making status invisible and preventing new job submissions.
So for long-term operation, I recommend stopping automatic updates for NVIDIA libraries.
To stop automatic updates, edit /etc/apt/apt.conf.d/50unattended-upgrades.
Add .*nvidia, .*libnvidia, .*cuda to Unattended-Upgrade::Package-Blacklist at the top:
// Python regular expressions, matching packages to exclude from upgrading
Unattended-Upgrade::Package-Blacklist {
    // The following matches all packages starting with linux-
//  "linux-";

    // Use $ to explicitly define the end of a package name. Without
    // the $, "libc6" would match all of them.
//  "libc6$";
//  "libc6-dev$";
//  "libc6-i686$";

    // Special characters need escaping
//  "libstdc\+\+6$";

    // The following matches packages like xen-system-amd64, xen-utils-4.1,
    // xenstore-utils and libxenstore3.0
//  "(lib)?xen(store)?";

    // For more information about Python regular expressions, see
    // https://docs.python.org/3/howto/regex.html
    ".*nvidia";
    ".*libnvidia";
    ".*cuda";
};
This stops automatic updates. When upgrading, manually execute sudo apt upgrade cuda-driver cuda-toolkit.
Incidentally, datacenter GPUs (Tesla, RTX A6000, RTX 6000Ada, A100, H100, etc.) have Forward capability, allowing execution of newer CUDA versions even with older Driver versions. Therefore, DGX-A100 etc. are configured not to auto-update, so basically stopping automatic updates should be fine.
This completes the minimum requirements for building a machine learning server. Now add users or configure LDAP, NFS as needed. Good work!