Modern Python Development Environment Template with uv, ruff, devcontainer, Claude Code
- 6/15/2025
- Update: 6/15/2025
- Python
Hello. This time, I’ve created a Python development environment template using modern tools like uv, ruff, devcontainer, Claude Code, and Cursor, so I’d like to introduce its contents. The template is published in the following repositories:
Template Features and Configuration
This template aims to be simple with high flexibility, so I’ve tried not to introduce too many tools. Too many tools increase the learning cost.
- uv: Fast Python virtual environment and package management tool built with Rust
- ruff: Fast Formatter and Linter built with Rust
- pytest: Testing framework
- pre-commit: Code quality assurance through formatting and linting before commits
- devcontainer: Unified development environment provisioning
- Docker, Docker Compose: Containerized portable execution environment provisioning
- GitHub Actions: CI provisioning
- AI rules: Appropriate AI development assistance for Cursor and Claude Code through rule definitions
The directory structure is as follows:
python-template/
├── .github/
│   └── workflows/                    # GitHub Actions workflow directory
├── .devcontainer/devcontainer.json   # devcontainer configuration file
├── .cursor/rules/                    # Cursor rule definitions directory
├── src/
│   └── python_template/              # Package root directory
├── tests/                            # pytest test scripts directory
├── docker/                           # Docker files directory
├── .gitignore                        # File to describe files excluded from git management
├── .python-version                   # File to describe Python version
├── .pre-commit-config.yaml           # pre-commit configuration file
├── compose.yml                       # Docker Compose
├── pyproject.toml                    # Project configuration
├── CLAUDE.md                         # Claude Code rule definitions
└── README.md                         # Project description
Quick Start
This template can easily create projects from templates interactively using a tool called Copier.
uvx copier copy gh:mjun0812/python-copier-template <output_directory>When you run this command, you can input basic project information interactively:
- Project name: Project name
- Python version: Python version
- Package name: Package name
- Description: Project description
- Author name: Author name
- Author email: Author’s email address
After inputting this information, the project will be created from the template.
Alternatively, you can create from the following GitHub Template:
After creating a project from the template, you can set up the development environment using devcontainer, or start local development by running the following commands:
uv sync
uv run pre-commit install
These commands will create a Python virtual environment with uv and install pre-commit.
Explanation
Here, I’ll explain each tool in this template.
pyproject.toml
pyproject.toml is a file for configuring Python projects.
It’s a project management file that replaces setup.py, and can describe basic information such as project name, version, dependencies, and builds, as well as settings for tools like uv and ruff mentioned later.
This template is based on pyproject.toml automatically created by uv, with the following content:
[project]
name = "{{project_name}}"
version = "0.0.1"
description = "{{description}}"
readme = "README.md"
authors = [{ name = "{{author_name}}", email = "{{author_email}}" }]
requires-python = ">={{python_version}}"
dependencies = []

[build-system]
requires = ["hatchling"]
build-backend = "hatchling.build"

[tool.hatch.build.targets.wheel]
packages = ["src/{{package_name}}"]

[dependency-groups]
dev = ["pre-commit>=4.2.0", "pytest>=8.4.0", "ruff>=0.11.12"]

[tool.ruff]
line-length = 100
target-version = "py{{python_version | replace('.', '')}}"
exclude = [".git", ".ruff_cache", ".venv", ".vscode"]
uv: Python Virtual Environment and Package Management
uv is a Python virtual environment and package management tool built with Rust, developed by Astral.
Previously, Python virtual environment and package management had tools like pyenv, pipenv, poetry, and Rye, but uv operates more than 10 times faster than these tools and has high portability, making uv the de facto standard for Python environment management. It’s fair to say that Python environment management tools have been unified around uv.
uv can be installed with the following command:
curl -LsSf https://astral.sh/uv/install.sh | shYou can install uv’s virtual environment and packages simultaneously with the following command:
uv syncTo add packages to the project, run the following command:
uv add <package_name>To remove packages, run the following command:
uv remove <package_name>To update packages, run the following command:
uv add <package_name> --upgrade-package <package_name>To run commands in the created virtual environment, run the following command:
uv run <command>
# Example
uv run python app.py
uv run ruff check .
Since it’s virtualenv-based, you can also reflect the virtual environment in the current shell:
# In the directory with .venv
source .venv/bin/activate
# Exit virtual environment
deactivate
To specify the Python version to use in the project, run the following command:
uv python pin <python_version>
# Example
uv python pin 3.12
Running this command creates a .python-version file with the Python version written in it. uv reads this file to determine the Python version for the virtual environment.
To update the uv.lock file containing details of all packages including actually installed dependencies, run the following command. Use this when manually editing pyproject.toml:
uv lockType Hints
Type hints in Python are a feature to improve code readability and maintainability by explicitly specifying types of function arguments and return values in code. Furthermore, using type hints can improve editor completion features and enhance the accuracy of AI development assistance from Cursor and Claude Code.
Python type hints are written in the following notation:
name: str = "mjun"
names: list[str] = ["mjun", "moririn"]

def add(a: int, b: int) -> int:
    return a + b
Unlike statically typed languages like C/C++ and Go, Python type hints don’t perform type checking at runtime, so no errors occur even if type hints are incorrect. To verify the correctness of type hints, you need to use static type checkers like mypy or pyright:
uv add mypy
uv run mypy .
This template doesn’t include them yet as we’re waiting for the stable release of ty, a Rust-built tool developed by astral (who develop uv and ruff). If you want to strictly enforce type hints, currently using mypy or pyright would be good.
Initially, I was skeptical about adding types to a dynamically typed language, but as AI-assisted development becomes mainstream, I feel it’s important to use type hints to improve AI output accuracy, so I’ve resigned myself to the idea that Python has become a language with type hints.
ruff: Code Format and Lint

ruff is a Python code formatting and linting tool built with Rust. Like uv mentioned earlier, it’s a tool developed by Astral, and being built with Rust, it operates very fast. ruff provides the same functionality as formatters and linters like Google’s black and flake8, covering code formatting and linting with this one tool.
Combined with uv mentioned earlier, you can format and lint code with the following commands:
uv run ruff format . # Format
uv run ruff check . # Lint
uv run ruff check --fix . # Lint & Fix it
Using the --fix option with ruff check will fix lint errors as much as possible.
To configure formatting and linting settings with Ruff, edit pyproject.toml as follows:
[tool.ruff]
line-length = 100 # Line length
target-version = "py{{python_version | replace('.', '')}}" # Target Python version
exclude = [".git", ".ruff_cache", ".venv", ".vscode"] # Directories to exclude

[tool.ruff.lint]
preview = true # Enables new rules and features that are not yet stable.
select = [
    # Rule selection
    "ANN", # type annotation
    "E",   # pycodestyle errors
    "F",   # pyflakes
    "I",   # isort
    "RUF", # ruff specific rules
    "W",   # pycodestyle warnings
    ...
]
ignore = [
    # Rules to ignore
    "B007",   # Unused loop variable
    "B008",   # Function call in default argument
    "B905",   # `zip()` without `strict=True`
    ...
]
unfixable = [
    # Rules not to auto-fix with uv run ruff check --fix .
    "F401", # unused import
    "F841", # unused variable
]

[tool.ruff.lint.per-file-ignores]
# Rules to ignore per file
"__init__.py" = ["F401"]

[tool.ruff.lint.pydocstyle]
# pydocstyle rule settings
# Specify docstring style
convention = "google"
The above is a partial excerpt. This template sets rules I commonly use, based on the following philosophy:
- Allow Japanese comments and docstrings
- Actively use modern Python syntax
- Use pathlib.Path instead of os.path
- Migration to modern Python syntax through pyupgrade rules
- Design assuming type hints
- Utilize editor completion features
- Better output accuracy when using Cursor and Claude Code AI development assistance with type hints
- Allow Any type usage as a last resort escape route
- Disable warnings that tend to interfere with development
- Don’t auto-fix unused variables (F841) and unused imports (F401) to prevent deletion during development
- Exclude rules like G004 (prohibit f-string in logging) that hinder realistic workflows
Ruff rules are still being refined, but I’m aiming for rules that use modern syntax while being development-friendly.
pytest: Testing Framework
pytest is a Python testing framework. While Python has unittest as a standard library for unit testing, pytest provides a more user-friendly API than unittest and is widely used in Python development.
pytest automatically detects and runs test files and test functions that follow specific naming conventions. pytest test files follow these naming conventions:
tests/test_<test_name>.pyTest functions follow these naming conventions:
def test_<test_name>():
    ...
For testing functions that would cause problems when actually executed, you can use mocks to change behavior during testing. To use mocks, use the standard library unittest.mock or pytest-mock:
uv add --dev pytest-mockTo run pytest, execute the following command:
uv run pytestTo display standard output and standard error output during pytest execution, use the -s option. To display detailed test execution results, use the -v option:
uv run pytest -s -vpre-commit: Code Quality Assurance Through Pre-commit Format and Lint
pre-commit is a tool that runs specific tasks before Git commits. This template ensures code quality before version control by configuring ruff formatting and linting to run before commits.
pre-commit configuration is written in the .pre-commit-config.yaml file:
repos:
  - repo: https://github.com/astral-sh/uv-pre-commit
    # uv version.
    rev: 0.7.11
    hooks:
      - id: uv-lock
  - repo: https://github.com/astral-sh/ruff-pre-commit
    # Ruff version.
    rev: v0.11.12
    hooks:
      # Run the linter.
      - id: ruff-check
        args: [--fix]
      # Run the formatter.
      - id: ruff-format
The first uv-pre-commit is configured to run uv lock. This synchronizes pyproject.toml and uv.lock.
The second ruff-pre-commit is configured to run ruff formatting and linting. While pre-commit can error out and stop commits, this template is configured to perform automatic fixes as much as possible.
To install pre-commit, run the following command:
uv run pre-commit installTasks defined in pre-commit can also be manually executed with the following command:
uv run pre-commit rundevcontainer: Unified Development Environment Provision
devcontainer is a mechanism to containerize development environments and provide unified development environments. Initially provided as a VSCode extension, it’s now managed by an Organization with defined standard specifications and can be operated from CLI.
As the name suggests, devcontainer uses containers to provide isolated development environments. By installing development tools, environments, and VSCode/Cursor extensions in containers, you can easily set up development environments regardless of host environment. Honestly, you might think it’s unnecessary since uv’s virtual environments make it easy to set up environments, but the advantages of devcontainer are reducing OS differences and isolating and aligning VSCode extensions.
This template uses devcontainer during coding with VSCode or Cursor to provide a unified Python development environment.
devcontainer configuration is written in the .devcontainer/devcontainer.json file.
Below is an example of devcontainer.json configuration used in this template. To avoid the management cost of preparing separate Dockerfiles for devcontainer, this template uses Ubuntu images for devcontainer published by Microsoft and installs necessary development tools using features. Using Docker images for devcontainer has advantages like automatically creating users with the same ID as the host inside containers.
Here’s an example configuration of devcontainer.json:
{
 "name": "python-devcontainer",
 "image": "mcr.microsoft.com/devcontainers/base:ubuntu",
 "containerEnv": {
  "DISPLAY": "${localEnv:DISPLAY}",
  "PYTHONUNBUFFERED": "1",
  "PYTHONDONTWRITEBYTECODE": "1",
  "UV_CACHE_DIR": "${containerWorkspaceFolder}/.cache/uv",
  "UV_LINK_MODE": "copy",
  "UV_PROJECT_ENVIRONMENT": "/home/vscode/.venv",
  "UV_COMPILE_BYTECODE": "1"
 },
 "features": {
  "ghcr.io/devcontainers/features/github-cli:1": {},
  "ghcr.io/devcontainers/features/common-utils:2": {
   "configureZshAsDefaultShell": true
  },
  "ghcr.io/rocker-org/devcontainer-features/apt-packages:1": {
   "packages": "curl,wget,git,jq,ca-certificates,build-essential,ripgrep"
  },
  "ghcr.io/va-h/devcontainers-features/uv:1": {
   "shellAutocompletion": true
  },
  "ghcr.io/devcontainers/features/node:1": {},
  "ghcr.io/anthropics/devcontainer-features/claude-code:1.0": {}
 },
 "runArgs": [
  "--init",
  "--rm"
 ],
 "hostRequirements": {
  "gpu": "optional"
 },
 "customizations": {
  "vscode": {
   "settings": {
    "python.defaultInterpreterPath": "/home/vscode/.venv/bin/python"
   },
   "extensions": [
    "ms-python.python",
    "charliermarsh.ruff",
    "eamodio.gitlens",
    "tamasfe.even-better-toml",
    "ms-toolsai.jupyter",
    "yzhang.markdown-all-in-one"
   ]
  }
 },
 "mounts": [
  "source=claude-code-config,target=/home/vscode/.claude,type=volume"
 ],
 "postCreateCommand": "uv sync",
 "postStartCommand": "uv run pre-commit install"
}
devcontainer.json configuration includes the following items:
features: Specifies features to add to the development environment. Using features allows installing tools like uv and Claude Code without writing new Dockerfiles.customizations: Configures editor settings like VSCode extensions. You can also specify content that would go in VSCode’s settings.json here.hostRequirements: Specifies host requirements. For example, you can specify the number of CPU cores or RAM capacity to allocate. To allocate GPU to containers when GPU is available on the host, specifygpuasoptional. This automatically adds the--gpus alloption during docker run, allowing you to run thenvidia-smicommand inside containers. Being optional means it works even when there’s no GPU on the host.postCreateCommand: Specifies commands to run after container creation. In the above example, it runsuv syncto create uv’s virtual environment.postStartCommand: Specifies commands to run after container startup. In the above example, it runspre-commit installto install pre-commit.
Docker, Docker Compose: Containerized Portable Execution Environment Provision

Docker is a platform for creating, distributing, and running lightweight containers that package the environment (OS, libraries, tools, etc.) needed to run applications. Using Docker allows easy sharing of portable execution environments. Container definitions are written in a file called Dockerfile, from which Docker images are built and containers are started.
Docker Compose is a tool for managing multiple containers using Docker. When projects need databases like MySQL, Docker Compose can be used to manage and start containers including databases together.
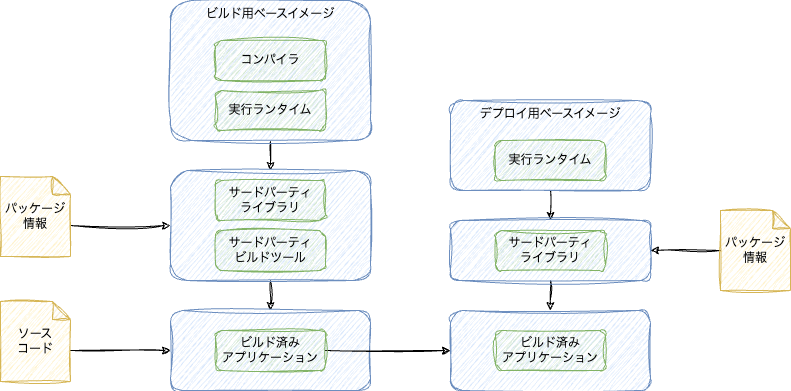
This template uses multi-stage build to reduce the final execution environment Docker image size, leading to reduced execution time. Furthermore, using multi-stage build improves build cache hit rates and enables parallel build execution, leading to reduced build time.
Below is an example Dockerfile configuration used in this template:
# syntax=docker/dockerfile:1

ARG BUILDER_IMAGE="ubuntu:24.04"
ARG RUNNER_IMAGE="ubuntu:24.04"

FROM $BUILDER_IMAGE AS builder # Builder stage

ENV DEBIAN_FRONTEND=noninteractive \
    UV_PYTHON_INSTALL_DIR="/opt/python" \
    UV_PROJECT_ENVIRONMENT="/opt/venv" \
    # Compile packages to bytecode after installation
    UV_COMPILE_BYTECODE=1 \
    # Copy packages from wheel
    UV_LINK_MODE=copy

RUN rm -f /etc/apt/apt.conf.d/docker-clean \
    && echo 'Binary::apt::APT::Keep-Downloaded-Packages "true";' > /etc/apt/apt.conf.d/keep-cache
RUN --mount=type=cache,target=/var/cache/apt,sharing=locked \
--mount=type=cache,target=/var/lib/apt,sharing=locked \
    apt-get update && apt-get install -y --no-install-recommends \
    git \
    curl \
    ca-certificates

COPY --from=ghcr.io/astral-sh/uv:latest /uv /bin/uv
WORKDIR /app

# Sync dependencies
RUN --mount=type=cache,target=/root/.cache/uv \
    --mount=type=bind,source=pyproject.toml,target=pyproject.toml \
    --mount=type=bind,source=.python-version,target=.python-version \
    --mount=type=bind,source=uv.lock,target=uv.lock \
    ulimit -n 8192 \
    && uv sync --locked --no-install-project --no-editable

# Sync this project
COPY . .
RUN --mount=type=cache,target=/root/.cache/uv \
    uv sync --locked --no-editable

FROM $RUNNER_IMAGE AS production # Runner stage

ENV DEBIAN_FRONTEND=noninteractive \
    PATH="/opt/venv/bin:$PATH" \
    UV_PYTHON_INSTALL_DIR="/opt/python" \
    UV_PROJECT_ENVIRONMENT="/opt/venv" \
    # Disable buffering of standard output and error streams
    PYTHONUNBUFFERED=1 \
    # Disable generation of .pyc files
    PYTHONDONTWRITEBYTECODE=1

# Copy Python
COPY --from=builder /opt/python /opt/python
COPY --from=builder /opt/venv /opt/venv
COPY --from=ghcr.io/astral-sh/uv:latest /uv /bin/uv

RUN rm -f /etc/apt/apt.conf.d/docker-clean \
    && echo 'Binary::apt::APT::Keep-Downloaded-Packages "true";' > /etc/apt/apt.conf.d/keep-cache
RUN --mount=type=cache,target=/var/cache/apt,sharing=locked \
    --mount=type=cache,target=/var/lib/apt,sharing=locked \
    apt-get update && apt-get install -y --no-install-recommends \
    git \
    curl \
    ca-certificates \
    build-essential \
    sudo \
    gosu

# Allow sudo without password
RUN echo '%sudo ALL=(ALL) NOPASSWD:ALL' >> /etc/sudoers

COPY --chmod=755 ./docker/entrypoint.sh /usr/local/bin/entrypoint.sh

ENTRYPOINT ["/usr/local/bin/entrypoint.sh"]
From FROM $BUILDER_IMAGE AS builder to FROM $RUNNER_IMAGE AS production is the builder stage in multi-stage build. The builder stage uses uv to install dependencies and build source code.
From FROM $RUNNER_IMAGE AS production onward is the runner stage in multi-stage build. Here, packages installed in the builder stage are copied to construct the execution environment as follows:
# Copy artifacts built in builder stage
COPY --from=builder /opt/python /opt/python
COPY --from=builder /opt/venv /opt/venv
COPY --from=ghcr.io/astral-sh/uv:latest /uv /bin/uv
By copying only builder stage artifacts, you can create lightweight Docker images without including unnecessary tools and packages in the execution environment.
Also, the above example uses cache mounts in the Dockerfile to speed up repeated apt install and uv sync operations.
RUN rm -f /etc/apt/apt.conf.d/docker-clean \
    && echo 'Binary::apt::APT::Keep-Downloaded-Packages "true";' > /etc/apt/apt.conf.d/keep-cache
RUN --mount=type=cache,target=/var/cache/apt,sharing=locked \
    --mount=type=cache,target=/var/lib/apt,sharing=locked \
    apt-get update && apt-get install -y --no-install-recommends \
    git \
    curl \
    ca-certificates \
    build-essential \
    sudo \
    gosu
When running apt with Docker, downloaded packages are normally not cached, so the first RUN block enables apt caching. The next RUN block uses --mount=type=cache,target=/var/cache/apt,sharing=locked and --mount=type=cache,target=/var/lib/apt,sharing=locked to cache once-downloaded packages and package list downloads.
Furthermore, this template aligns container users with host users so that artifacts generated inside containers can be operated by host users. For details, see docker/entrypoint.sh and docker/run.sh in the template.
GitHub Actions: CI Provision

GitHub Actions is a CI/CD tool provided by GitHub. For repositories hosted on GitHub, you can specify conditions like commits or pull request creation to execute specific actions.
This template uses GitHub Actions to run ruff Format and Lint when commits are made or pull requests are created. While pre-commit is also configured to run ruff Format and Lint, pre-commit requires manual installation during local development, so GitHub Actions also runs to prevent Format and Lint execution oversights.
GitHub Actions configuration is placed in the .github/workflows directory.
Below is an example GitHub Actions configuration used in this template:
name: CI
on:
  push:
    branches:
      - main
  pull_request:
    branches:
      - main
jobs:
  ci:
    runs-on: ubuntu-latest
    steps:
      - uses: actions/checkout@v4
      - name: Install uv
        uses: astral-sh/setup-uv@v4

      - name: Format
        run: uvx ruff format . --check --diff

      - name: Lint
        run: uvx ruff check --output-format=github .
This configuration runs ruff Format and Lint when commits are pushed to the main branch or when pull requests are created against the main branch.
AI rules: Appropriate AI Development Assistance Through Rule Definitions for Cursor and Claude Code


This template defines project development rules when using Claude Code or Cursor to enable appropriate AI development assistance. When using Claude Code, rules are defined in the CLAUDE.md file, and when using Cursor, rules are defined under .cursor/rules.
Referring to the following article, I’ve made rule definitions as simple as possible:

Usage Examples
For PyTorch Model Development (CUDA Support)
For PyTorch model development, torch package addition is described in pyproject.toml as follows:
[project]
name = "project"
version = "0.1.0"
requires-python = ">=3.12.0"
dependencies = [
  "torch>=2.7.0",
]

[tool.uv.sources]
torch = [
    { index = "torch-cuda", marker = "sys_platform == 'linux' and platform_machine == 'x86_64'" },
    { index = "torch-cpu", marker = "sys_platform == 'darwin' or (sys_platform == 'linux' and platform_machine == 'aarch64')" },
]

[[tool.uv.index]]
name = "pytorch-cpu"
url = "https://download.pytorch.org/whl/cpu"
explicit = true

[[tool.uv.index]]
name = "pytorch-cuda"
url = "https://download.pytorch.org/whl/cu128"
explicit = true
Writing as above installs PyTorch with CUDA on x86_64 Linux and PyTorch with CPU on other environments (macOS, devcontainer on macOS, arm Linux). Furthermore, by making Docker’s builder image a CUDA-enabled image, you can install packages that require CUDA for building.
BUILDER_IMAGE="nvcr.io/nvidia/cuda:12.8.1-cudnn-devel-ubuntu24.04"
RUNNER_IMAGE="ubuntu:24.04"
IMAGE_NAME=$(basename $(pwd) | tr '[:upper:]' '[:lower:]')

docker build \
    --build-arg BUILDER_IMAGE=${BUILDER_IMAGE} \
    --build-arg RUNNER_IMAGE=${RUNNER_IMAGE} \
    -t "${IMAGE_NAME}:latest" \
    -f docker/Dockerfile .
Also, using images without CUDA for runner images allows Docker Image lightweighting. Note that when installing PyTorch, builtin CUDA is included, so images don’t need CUDA for using PyTorch.
Reference: https://zenn.dev/turing_motors/articles/3a434d046bbf48
When running training and inference scripts, execute in container environment using docker/run.sh as follows:
./docker/run.sh python train.pyExecuting using the above script aligns host and container users, so model weights and logs after training can be operated on the host without permission issues.
Adding Static Type Checker mypy
To add static type checker mypy to this template, first install mypy with uv:
uv add --dev mypyConfigure pre-commit to run mypy:
- repo: https://github.com/pre-commit/mirrors-mypy
  rev: v1.16.0
  hooks:
    - id: mypy
      args: [--ignore-missing-imports]
Configure GitHub Actions to run mypy:
jobs:
  ci:
    runs-on: ubuntu-latest
    steps:
      - uses: actions/checkout@v4
      - name: Install uv
        uses: astral-sh/setup-uv@v4

      - name: Format
        run: uvx ruff format . --check --diff

      - name: Lint
        run: uvx ruff check --output-format=github .

      - name: Type check
        run: uvx mypy . --ignore-missing-imports --no-namespace-packages
Using Jupyter Notebook
To use Jupyter Notebook, first install Jupyter with uv:
uv add jupyterTo run Jupyter Notebook, execute the following command:
uv run jupyter notebook --no-browserSince Jupyter Notebooks are often written disposably, if you don’t want ruff Lint, describe in pyproject.toml as follows:
[tool.ruff]
exclude = ["*.ipynb"]
Summary
Above, I’ve explained the template I created and the tools used in it. What tools to adopt in projects depends on the time, so please use this template as reference to select tools suited to your project. I hope this article is helpful!