Building MLflow on an On-Prem Server with Docker Compose, MySQL, and RustFS
- 12/16/2025
- Update: 12/16/2025
- Tool
Note
This article is an updated edition of Building MLflow on an on-premises server. The previous version used MinIO for the artifact storage layer, whereas this one switches to RustFS.
Hi there! In this post I will walk through how to build MLflow—the MLOps platform for experiment and model management—on an on-premises server with Docker Compose, MySQL, and RustFS.
In the predecessor article I relied on MinIO, an OSS S3-compatible object storage. However, MinIO’s OSS edition stopped distributing Docker images, and even the source has transitioned to maintenance mode. As an alternative, we will build the stack with RustFS, an OSS object storage system written in Rust.
Warning
As of 2025-12-16 RustFS has not had an official release yet. This guide uses the alpha release, so unexpected issues might occur. Please keep that in mind when testing it.
The full example is available on GitHub:
Official docs:
MLflow

RustFS
Background
Machine-learning projects involve running many experiments while tweaking hyperparameters, models, and datasets. Introducing an experiment management tool keeps comparisons efficient and lets you focus on model development. There are plenty of tools—TensorBoard, Weights & Biases (wandb), and more—but the choices shrink if you need everything to stay on-premises with no external data transfer. MLflow is one of the go-to platforms that satisfies that requirement, so let’s build it on-prem.
What Is MLflow?
MLflow is an open-source MLOps platform that supports the following five use cases:
- Tracking & Experiment Management: manage and compare experiment results.
- Model Registry: manage machine-learning model versions.
- Model Deployment: serve trained models.
- ML Library Integration: integrate with ML libraries.
- Model Evaluation: evaluate model performance.
To cover these scenarios you need a database as the backend store for parameters, plus an object storage service as the artifact store for model weights, logs, and other files. We’ll use Docker Compose to wire everything so MLflow runs fully on-prem.
- Backend store: MySQL
- Artifact store: RustFS
I primarily use MLflow’s Tracking Server, so the article centers on that component, but you can adapt the same setup for the other features as well.
Architecture
We’ll spin up the MLflow server with Docker Compose using the following architecture.
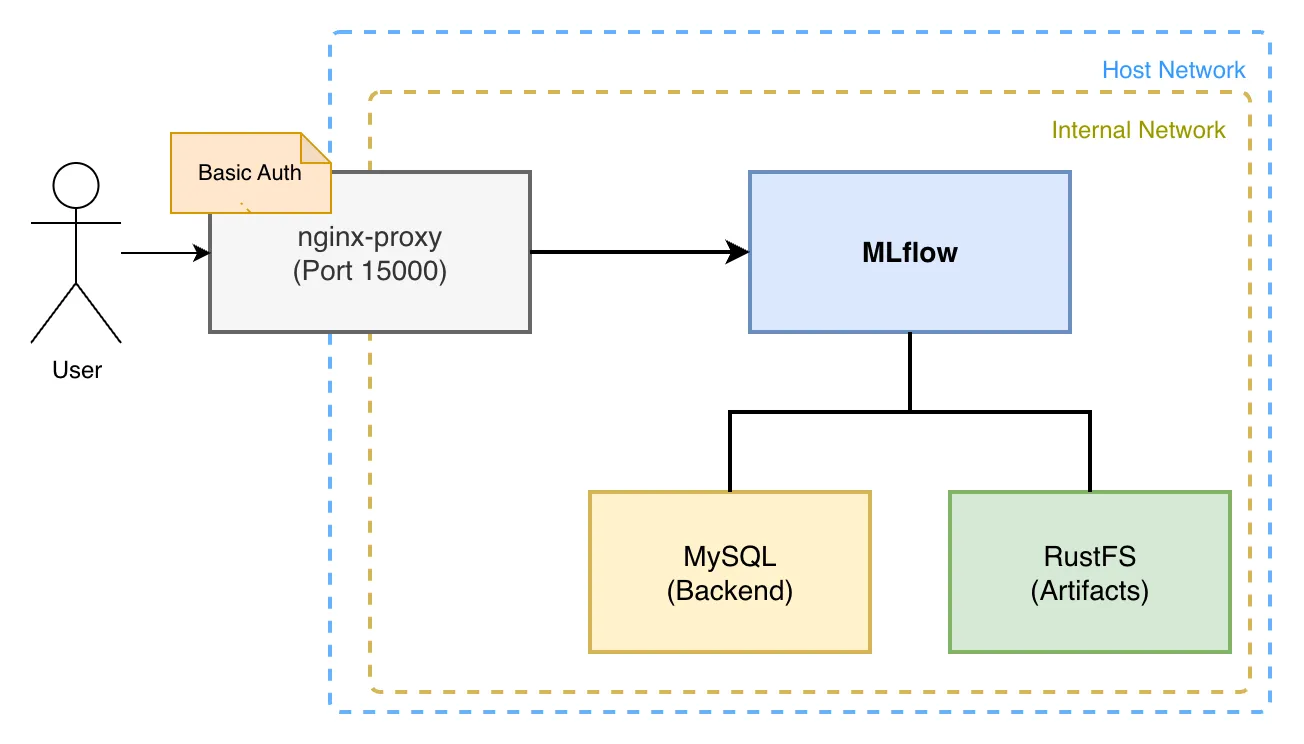
The MLflow Tracking Server persists parameters and results in MySQL and stores artifacts in RustFS. The Web UI sits behind an Nginx proxy with Basic authentication so only specific users can reach it.
Quick Start
If you just want to get up and running, clone the repository below and follow the README.md instructions or run the listed commands.
git clone https://github.com/mjun0812/MLflow-Docker.git
cd MLflow-Docker
cp env.template .env
vim .env
Edit .env to set the listening domain and (optionally) pin the MLflow version.
# Set the listening domain.
# Using only localhost limits access to the local machine.
VIRTUAL_HOST=localhost
# Optionally pin a specific MLflow version.
# If omitted, the latest version is used.
MLFLOW_VERSION=
(Optional) To enable Basic auth, populate the nginx/htpasswd/localhost file with a username and password:
htpasswd -c nginx/htpasswd/localhost [username]Next, build the images and start the containers:
docker compose up -dYou can now reach the MLflow Web UI at localhost:15000.
To access MLflow from Python, configure it like this:
import os

import mlflow

# Enable Basic auth if necessary.
os.environ["MLFLOW_TRACKING_USERNAME"] = "username"
os.environ["MLFLOW_TRACKING_PASSWORD"] = "password"

# Configure via environment variables.
os.environ["MLFLOW_TRACKING_URI"] = "http://localhost:15000"

mlflow.set_tracking_uri("http://localhost:15000")
mlflow.set_experiment("example")

with mlflow.start_run():
  mlflow.log_param("param1", 1)
  mlflow.log_metric("metric1", 1)
Build Details
Let’s look at the full file set and then dive into each container configuration. This example brings up the following services:
- Nginx Proxy (jwilder/nginx-proxy)
- MLflow Server (custom Dockerfile)
- MySQL
- RustFS
services:
  nginx-proxy:
    image: jwilder/nginx-proxy:latest
    restart: unless-stopped
    ports:
      - "15000:80"
    volumes:
      - ./nginx/htpasswd:/etc/nginx/htpasswd
      - ./nginx/conf.d/proxy.conf:/etc/nginx/conf.d/proxy.conf
      - /var/run/docker.sock:/tmp/docker.sock:ro
    networks:
      - mlflow-net

  mlflow:
    build:
      context: .
      dockerfile: Dockerfile
      args:
        MLFLOW_VERSION: ${MLFLOW_VERSION}
    expose:
      - "80"
    restart: unless-stopped
    depends_on:
      db:
        condition: service_healthy
      rustfs-init:
        condition: service_completed_successfully
    env_file:
      - .env
    environment:
      TZ: Asia/Tokyo
      VIRTUAL_HOST: "${VIRTUAL_HOST:-localhost}"
      MLFLOW_S3_ENDPOINT_URL: http://rustfs:9000
      AWS_ACCESS_KEY_ID: rustfs-mlflow
      AWS_SECRET_ACCESS_KEY: rustfs-mlflow
      MLFLOW_BACKEND_STORE_URI: mysql+mysqldb://mlflow:mlflow@db:3306/mlflow
    command: >
      mlflow server
      --backend-store-uri 'mysql+mysqldb://mlflow:mlflow@db:3306/mlflow'
      --artifacts-destination 's3://mlflow/artifacts'
      --serve-artifacts
      --host 0.0.0.0
      --port 80
    networks:
      - mlflow-net
      - mlflow-internal-net

  db:
    image: mysql:latest
    restart: unless-stopped
    environment:
      MYSQL_USER: mlflow
      MYSQL_PASSWORD: mlflow
      MYSQL_ROOT_PASSWORD: mlflow
      MYSQL_DATABASE: mlflow
      TZ: Asia/Tokyo
    volumes:
      - ./mysql/data:/var/lib/mysql
      - ./mysql/my.cnf:/etc/mysql/conf.d/my.cnf
    healthcheck:
      test: ["CMD", "mysqladmin", "ping", "-h", "localhost"]
      interval: 5s
      timeout: 10s
      retries: 5
    networks:
      - mlflow-internal-net

  rustfs:
    image: rustfs/rustfs:latest
    security_opt:
      - "no-new-privileges:true"
    # ports:
    #   - "9000:9000" # S3 API port
    environment:
      - RUSTFS_VOLUMES=/data/rustfs
      - RUSTFS_ADDRESS=0.0.0.0:9000
      - RUSTFS_CONSOLE_ENABLE=false
      - RUSTFS_EXTERNAL_ADDRESS=:9000
      - RUSTFS_CORS_ALLOWED_ORIGINS=*
      - RUSTFS_ACCESS_KEY=rustfs-mlflow
      - RUSTFS_SECRET_KEY=rustfs-mlflow
      - RUSTFS_OBS_LOGGER_LEVEL=info
      # Object Cache
      - RUSTFS_OBJECT_CACHE_ENABLE=true
      - RUSTFS_OBJECT_CACHE_TTL_SECS=300
    volumes:
      - ./rustfs:/data/rustfs
    restart: unless-stopped
    healthcheck:
      test: ["CMD", "sh", "-c", "curl -f http://localhost:9000/health"]
      interval: 30s
      timeout: 10s
      retries: 3
      start_period: 40s
    networks:
      - mlflow-internal-net
      # - mlflow-net

  rustfs-init:
    image: amazon/aws-cli:latest
    depends_on:
      rustfs:
        condition: service_healthy
    environment:
      - AWS_ACCESS_KEY_ID=rustfs-mlflow
      - AWS_SECRET_ACCESS_KEY=rustfs-mlflow
      - AWS_DEFAULT_REGION=us-east-1
      - AWS_REGION=us-east-1
    entrypoint: /bin/sh
    command: -c "aws --endpoint-url http://rustfs:9000 s3api create-bucket --bucket mlflow || true"
    restart: "no"
    networks:
      - mlflow-internal-net

  # RustFS volume permissions fixer service
  volume-permission-helper:
    image: alpine
    volumes:
      - ./rustfs:/data
    command: >
      sh -c "
        chown -R 10001:10001 /data &&
        echo 'Volume Permissions fixed' &&
        exit 0
      "
    restart: "no"

networks:
  mlflow-net:
    driver: bridge
  mlflow-internal-net:
    internal: true
nginx-proxy
Nginx Proxy forwards the MLflow Web UI. The jwilder/nginx-proxy image requires almost no manual Nginx config—just add the right volumes, Compose directives, and environment variables to expose MLflow behind Basic auth.
nginx-proxy:
  image: jwilder/nginx-proxy:latest
  restart: unless-stopped
  ports:
    - "15000:80"
  volumes:
    - ./nginx/htpasswd:/etc/nginx/htpasswd
    - ./nginx/conf.d/proxy.conf:/etc/nginx/conf.d/proxy.conf
    - /var/run/docker.sock:/tmp/docker.sock:ro
  networks:
    - mlflow-net
Even though we only proxy a single service, the nginx-proxy setup makes it easy to switch domains or toggle Basic authentication just by editing files.
First, add global settings to nginx/conf.d/proxy.conf:
client_max_body_size 100g;This raises the upload limit so MLflow can push large artifacts.
Next, configure the listening domain and Basic auth via the VIRTUAL_HOST environment variable on the MLflow container.
mlflow:
  expose:
    - "80"
  environment:
    VIRTUAL_HOST: "example.com,localhost"
You can specify multiple domains separated by commas. The ports exposed through expose are mapped by nginx-proxy, so configure its ports accordingly:
nginx-proxy:
  ports:
    - "15000:80"
Now example.com:15000 and localhost:15000 both reach MLflow.
To enable Basic auth, add credentials to the nginx/htpasswd directory mounted into the proxy. Name each file after the domain it protects.
cd nginx/htpasswd
htpasswd -c example.com [username]
cp example.com localhost
With this in place, example.com and localhost both require the same credentials, and the proxy automatically reloads updated settings when containers restart.
MLflow
The MLflow server is defined via a Dockerfile plus Compose service configuration. Set the MLflow version through the MLFLOW_VERSION build argument; leaving it empty pulls the latest.
MLflow talks to the database via SQLAlchemy, so we install mysqlclient as the MySQL driver. We also add boto3 for access to RustFS, which exposes an S3-compatible API.
FROM python:3.13

ARG MLFLOW_VERSION=""

RUN if [ -n "$MLFLOW_VERSION" ]; then \
        pip install --no-cache-dir mlflow=="$MLFLOW_VERSION" mysqlclient boto3; \
    else \
        pip install --no-cache-dir mlflow mysqlclient boto3; \
    fi
Inside the container we run mlflow server. The --backend-store-uri option points to MySQL, and --artifacts-destination points to the bucket/folder inside RustFS. The --serve-artifacts flag makes the server mediate artifact uploads instead of connecting clients directly to S3.
mlflow:
  build:
    context: .
    dockerfile: Dockerfile
    args:
      MLFLOW_VERSION: ${MLFLOW_VERSION}
  expose:
    - "80"
  restart: unless-stopped
  depends_on:
    db:
      condition: service_healthy
    rustfs-init:
      condition: service_completed_successfully
  env_file:
    - .env
  environment:
    TZ: Asia/Tokyo
    VIRTUAL_HOST: "${VIRTUAL_HOST:-localhost}"
    MLFLOW_S3_ENDPOINT_URL: http://rustfs:9000
    AWS_ACCESS_KEY_ID: rustfs-mlflow
    AWS_SECRET_ACCESS_KEY: rustfs-mlflow
    MLFLOW_BACKEND_STORE_URI: mysql+mysqldb://mlflow:mlflow@db:3306/mlflow
  command: >
    mlflow server
    --backend-store-uri 'mysql+mysqldb://mlflow:mlflow@db:3306/mlflow'
    --artifacts-destination 's3://mlflow/artifacts'
    --serve-artifacts
    --host 0.0.0.0
    --port 80
  networks:
    - mlflow-net
    - mlflow-internal-net
RustFS
RustFS uses three containers: rustfs for serving, plus two helper jobs that run only during initialization.
rustfs-init: creates the bucket at startup.volume-permission-helper: fixes permissions on the RustFS volume if necessary.rustfs: the main RustFS server.
rustfs:
  image: rustfs/rustfs:latest
  security_opt:
    - "no-new-privileges:true"
  # ports:
  #   - "9000:9000" # S3 API port
  environment:
    - RUSTFS_VOLUMES=/data/rustfs
    - RUSTFS_ADDRESS=0.0.0.0:9000
    - RUSTFS_CONSOLE_ENABLE=false
    - RUSTFS_EXTERNAL_ADDRESS=:9000
    - RUSTFS_CORS_ALLOWED_ORIGINS=*
    - RUSTFS_ACCESS_KEY=rustfs-mlflow
    - RUSTFS_SECRET_KEY=rustfs-mlflow
    - RUSTFS_OBS_LOGGER_LEVEL=info
    # Object Cache
    - RUSTFS_OBJECT_CACHE_ENABLE=true
    - RUSTFS_OBJECT_CACHE_TTL_SECS=300
  volumes:
    - ./rustfs:/data/rustfs
  restart: unless-stopped
  healthcheck:
    test: ["CMD", "sh", "-c", "curl -f http://localhost:9000/health"]
    interval: 30s
    timeout: 10s
    retries: 3
    start_period: 40s
  networks:
    - mlflow-internal-net
    # - mlflow-net

rustfs-init:
  image: amazon/aws-cli:latest
  depends_on:
    rustfs:
      condition: service_healthy
  environment:
    - AWS_ACCESS_KEY_ID=rustfs-mlflow
    - AWS_SECRET_ACCESS_KEY=rustfs-mlflow
    - AWS_DEFAULT_REGION=us-east-1
    - AWS_REGION=us-east-1
  entrypoint: /bin/sh
  command: -c "aws --endpoint-url http://rustfs:9000 s3api create-bucket --bucket mlflow || true"
  restart: "no"
  networks:
    - mlflow-internal-net

# RustFS volume permissions fixer service
volume-permission-helper:
  image: alpine
  volumes:
    - ./rustfs:/data
  command: >
    sh -c "
      chown -R 10001:10001 /data &&
      echo 'Volume Permissions fixed' &&
      exit 0
    "
  restart: "no"
The snippet below shows how to enable the RustFS Web UI by exposing the console port and extending the proxy configuration.
nginx-proxy:
  ports:
    - "15001:9001"

rustfs:
  image: rustfs/rustfs:latest
  security_opt:
    - "no-new-privileges:true"
  ports:
    # - "9000:9000" # S3 API port
  # Add the Nginx proxy settings.
  expose:
    - "9001"
  environment:
    # Domain settings
    - VIRTUAL_HOST=example.com,localhost

    - RUSTFS_VOLUMES=/data/rustfs
    - RUSTFS_ADDRESS=0.0.0.0:9000
    - RUSTFS_EXTERNAL_ADDRESS=:9000
    - RUSTFS_CORS_ALLOWED_ORIGINS=*
    - RUSTFS_ACCESS_KEY=rustfs-mlflow
    - RUSTFS_SECRET_KEY=rustfs-mlflow
    - RUSTFS_OBS_LOGGER_LEVEL=info

    # Web UI settings
    - RUSTFS_CONSOLE_ADDRESS=0.0.0.0:9001
    - RUSTFS_CONSOLE_ENABLE=true
    - RUSTFS_CONSOLE_CORS_ALLOWED_ORIGINS=*

    # Object Cache
    - RUSTFS_OBJECT_CACHE_ENABLE=true
    - RUSTFS_OBJECT_CACHE_TTL_SECS=300
  volumes:
    - ./rustfs:/data/rustfs
  restart: unless-stopped
  healthcheck:
    test: ["CMD", "sh", "-c", "curl -f http://localhost:9000/health"]
    interval: 30s
    timeout: 10s
    retries: 3
    start_period: 40s
  networks:
    - mlflow-internal-net
With this configuration the RustFS Web UI is reachable at example.com:15001 and localhost:15001.
Migrating to RustFS
The mc command from MinIO makes it easy to migrate data into RustFS because it provides bucket mirroring (rsync-like) functionality.
Use the following steps to mirror data:
- Ensure you can reach both the source and destination S3-compatible storages.
- Run the MinIO Client container with
--net host:
docker run --rm -it --net host --entrypoint sh minio/mc- Configure the connection info inside the container.
# Source
mc alias set src http://host.docker.internal:10000 <ACCESS_KEY> <SECRET_KEY>
# Destination
mc alias set dst http://host.docker.internal:9000 <ACCESS_KEY> <SECRET_KEY>- Mirror the data with
mc mirror:
mc mirror src/mlflow/artifacts dst/mlflow/artifacts